


32
2-4 Other Settings with V.Networks Setup Tool [4. Recording Setting]
Preparations (Step 2 Setting the Network)
This function records the image to the memory of VN-C10 when an alarm is activated.
(This cannot be set for MPEG4.)
• When an alarm is activated, image recording can be carried out in one of the following two ways.
One way, local recording, saves images to the VN-C10 memory, and the other records images with
[V.Networks Controller] and saves them to the PC hard disc drive, etc. (
☞ Page 51)
1.
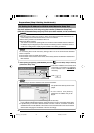
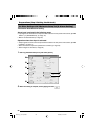
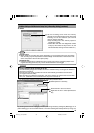
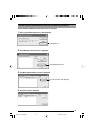
Start up [V.Networks Setup Tool] and select [Recording].
To make new values effective, press [Apply] and then .
Trigger Recording
For setting the frame rate for local recording,
select [Change the Recording FrameRate
during trigger recording] and set the frame
rate (30, 15, 10, 8, 7, 6, 5, 4, 3, 2 or 1). The
default value is 30 fps.
For selecting the record starting trigger, the
alarm input signal to start local recording.
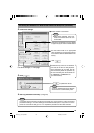
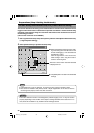
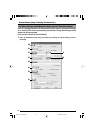
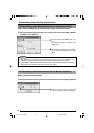
2.
Frame Rate
For setting the recording time. Up to 60
seconds can be set both before and after
an alarm input.
Caution
● If the value for before a trigger is set
to “0,” set a different value for after
the trigger. Both values cannot be set
to “0” at the same time.
● Because of the memory capacity of
VN-C10, the setting times before and
after a trigger and the actual maxi-
mum recording time are not the
same.
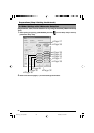
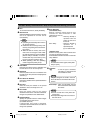
Example:
• If 160x120 (30 fps)/320x240 (15 fps)/
640x480 (5 fps) with a compression
rate of 2, the actual recording time is
5 to 0 and 30 to 35 seconds, before
and after a trigger respectively.
•For the maximum recording (30 be-
fore and 60 seconds after a trigger),
perform the setting as follows:
Image size : 160x120
Frame rate : 30 fps
Compression rate : 7
VN-C10_E_01-43.pm65e 14/04/03, 10:13 AM32