


44
FAN SHAFT BEARINGS — Lubricate bearings at least
every 6 months with suitable bearing grease. Extended grease
line is provided for far side fan bearing (opposite drive side).
Typical lubricants are given below:
*Preferred lubricant because it contains rust and oxidation inhibitors.
CONDENSER AND EVAPORATOR-FAN MOTOR
BEARINGS — The condenser-fan and evaporator-fan motors
have permanently sealed bearings, so no field lubrication is
necessary.
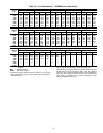
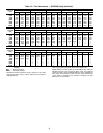
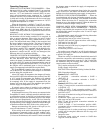
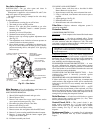
Evaporator Fan Performance Adjustment
(Fig. 50 and 51) — Fan motor pulleys are factory set for
speed shown in Table 1.
To change fan speeds:
1. Shut off unit power supply.
2. Loosen nuts on the 2 carriage bolts in the motor mounting
base. Install jacking bolt and plate under motor base (bolt
and plate are shipped in installer’s packet). Using bolt and
plate, raise motor to top of slide and remove belt. Secure
motor in this position by tightening the nuts on the car-
riage bolts.
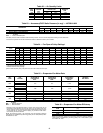
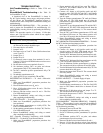
3. Loosen movable-pulley flange setscrew (see Fig. 50).
4. Screw movable flange toward fixed flange to increase
speed and away from fixed flange to decrease speed. In-
creasing fan speed increases load on motor. Do not ex-
ceed maximum speed specified in Table 1.
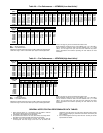
See Table 22 for air quantity limits.
5. Set movable flange at nearest keyway of pulley hub and
tighten setscrew. (See Table 1 for speed change for each
full turn of pulley flange.)
6. Replace and tighten belts. See Belt Tension Adjustment
sectiononpage45.
To align fan and motor pulleys:
1. Loosen fan pulley setscrews.
2. Slide fan pulley along fan shaft.
3. Make angular alignment by loosening motor from
mounting plate.
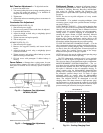
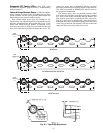
Evaporator Fan Service and Replacement — The
48TM units use a fan motor mounting system that features a
slide-out motor mounting plate. See Fig. 51. To replace or ser-
vice the motor, slide out the bracket.
1. Remove the evaporator-fan access panel and the heat-
ing control access panel.
2. Remove the center post (located between the evaporator
fan and heating control access panels) and all screws
securing it.
3. Loosen nuts on the 2 carriage bolts in the motor mounting
base.
4. Using jacking bolt under motor base, raise motor to top of
slide and remove belt. Secure motor in this position by
tightening the nuts on the carriage bolts.
5. Remove the belt drive.
6. Remove jacking bolt and tapped jacking bolt plate.
7. Remove the 2 screws that secure the motor mounting
plate to the motor support channel.
8. Remove the 3 screws from the end of the motor support
channel that interfere with the motor slide path.
9. Slide out the motor and motor mounting plate.
10. Disconnect wiring connections and remove the 4 mount-
ing bolts.
11. Remove the motor.
12. To install the new motor, reverse Steps 1-11.
MANUFACTURER LUBRICANT
Texaco Regal AFB-2*
Mobil Mobilplex EP No. 1
Sunoco Prestige 42
Texaco Multifak 2
Fig. 50 — Evaporator-Fan Pulley
and Adjustment
NOTE: A 3
1
/
2
-in. bolt and threaded plate are included in the
installer’s packet. They should be added to the motor support chan-
nel below the motor mounting plate to aid in raising the motor. The
plate part number is 50DP503842. The adjustment bolt is
3
/
8
-16 x
1
3
/
4
in. LG.
Fig. 51 — Evaporator-Fan Motor Section