


Z-8550A, 8560A
9. ADJUSTMENTS
73
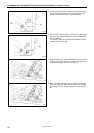
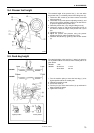
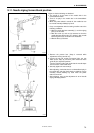
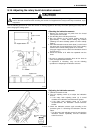
9-10. Needle bar height
With the accessory needle bar height gauge (2) installed to
the needle bar (1), adjust so that the needle bar height
gauge (2) is touching the top of the needle plate (3) when
the needle bar (1) is at its lowest position.
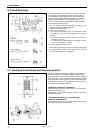
1. Remove the needle (4) and the presser foot (5).
For the 8560A (Refer to Fig. A)
1) Remove the needle plate (3) and then the auxiliary
needle plate (6).
2) Remove the needle plate spacer (7).
3) Place the needle plate (3) onto the needle plate
installation surface.
2. Install the accessory needle bar height gauge (2) to the
needle bar (1), and then tighten it with the set screw (8).
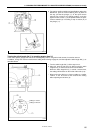
3. Loosen the screw (9).
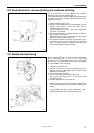
4. Move the needle bar up or down to adjust so that the
needle bar height gauge (2) is touching the top of the
needle plate (3) when the machine pulley is turned so
that the needle bar (1) is at its lowest position.
5. Securely tighten the screw (9).
6. Remove the needle bar height gauge (2).
7. For the 8560A, install the needle plate spacer (7), needle
plate (3) and auxiliary needle plate (6).
8. Install the presser foot (5) and the needle (4).
Touching
8560A (Fig. A)
3522M
3805M
Touching