


HE-800A
CONTENTS
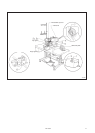
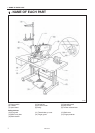
1. NAME OF EACH PART........................ 1
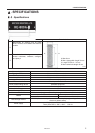
2. SPECIFICATIONS ................................
2
2-1. Specifications ................................................. 2
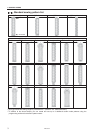
2-2. Standard sewing pattern list ........................... 3
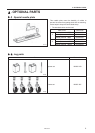
3. OPTIONAL PARTS............................... 4
3-1. Special needle plate ....................................... 4
3-2. Leg parts......................................................... 4
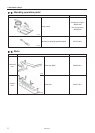
3-3. Standing operation pedal................................ 5
3-4. Ruler ............................................................... 5
3-5. Tape guard ..................................................... 6
4.INSTALLATION...................................... 7
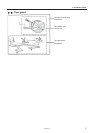
4-1. Table processing diagram .............................. 7
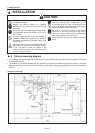
4-2. Installing the motor ......................................... 8
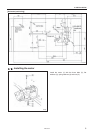
4-3. Installing the flange nut................................... 9
4-4. Installing the control box................................. 9
4-5. Installing the power switch.............................. 10
4-6. Installing the bed base.................................... 10
4-7. Installing the machine head............................ 11
4-8. Installing the head rest ................................... 11
4-9. Installing the operation panel .........................12
4-10. Routing the connector cord and
installing the oil stopper plate ....................... 12
4-11. Connecting the cords.................................... 13
4-11-1. Connecting the ground wire ..............13
4-11-2. Connecting the machine
head harness ....................................13
4-11-3. Connecting the motor harness..........14
4-11-4. Connecting the power cord ...............15
4-11-5. Connecting the standing operation
pedal harness (option) ...................... 16
4-11-6. Installing the transformer .................. 17
4-12. Installing the V-belt....................................... 19
4-13. Installing the belt cover plate........................ 20
4-14. Installing the treadle connecting rod............. 21
4-14-1. Changing the treadle unit
installation position
(horizontal positioning only) ..............22
4-15. Installing the spool stand.............................. 23
4-16. Installing the eye guard ................................ 23
4-17. Lubrication ....................................................24
4-17-1. Lubricating the bed base................... 24
4-17-2. Lubricating the arm ........................... 25
4-17-3. Lubricating the rotary hook ............... 25
4-18. Installing the belt cover................................. 26
4-19. Installing the auxiliary table .......................... 26
5. OPERATION.........................................27
5-1. Name and function of each operation panel item..27
5-2. Home position detection (preparation)............29
5-3. Operating the treadle ......................................30
5-3-1. Operating the standing operation
pedal (option) ......................................31
5-4. Program setting method..................................32
5-4-1. Program setting examples...................33
5-4-2. Checking the length of knife ................35
5-5. Parameter table ..............................................36
5-5-1. Available sewing area..........................45
5-5-2. Setting the knife length........................46
5-5-3. Buttonhole sewing size........................46
5-5-4. Main restrictions when setting
parameters ..........................................46
5-6. Rear tack vector shape programs...................48
5-7. Underlay programs .........................................49
5-8. Cutter operation ..............................................50
5-9. Cycle program.................................................51
5-10. Production counter........................................52
5-11. Bobbin thread counter...................................53
5-12. Using the program memos............................53
5-13. Adding patterns created using the
programming software for electronic
pattern sewer.................................................54
6. CHECKING THE SEWING PATTERN .55
6-1. Test feed mode...............................................55
6-2. Manual mode ..................................................56
7. CORRECT USE ....................................57
7-1. Installing the needle........................................57
7-2. Threading the upper thread ............................58
7-3. Winding the lower thread ................................59
7-4. Threading the bobbin case .............................60
7-5. Thread tension................................................61
7-5-1. Lower thread tension...........................61
7-5-2. Upper thread tension...........................62
7-5-3. Thread take-up spring height ..............63
7-5-4. Thread take-up spring tension.............63
7-5-5. Adjusting arm thread guide .................63
8. SEWING ...............................................64
8-1. Sewing ............................................................64
8-2. If the stop switch is pressed during sewing ....65
8-3. If the thread breaks during sewing..................66
8-4. Thread breakage before sewing is finished....67
8-5. When resuming sewing in test feed mode
or manual mode ..............................................68