


D1265 | Owner's Manual | Appendix
Bosch Security Systems, Inc. | 9/10 | F01U169130-02 67
Appendix
Supplementary Information for Adding
Passcodes
Use the information contained in this Supplement to
help you add user passcodes.
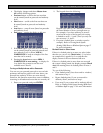
User Authority Levels
Your security company uses the information contained
on this page to establish authority levels for system
users. For each of the 1- 14 authority levels, each
keypad function is either enabled (E), disabled (blank),
or Passcode enabled (P). A function that is enabled (E)
is available to all users. A function that is passcode
enabled (P) is only available to users assigned an
authority level that includes that function. If you do not
want a particular command included in a given
authority level, leave it blank.
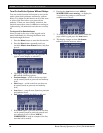
If you are having trouble understanding the concept of
authority levels, try this simple exercise. Refer to the
column titled E/P in the User Interface section starting
on page 67. Notice that your security technician has
marked some of the cells in this column with the letter
“E”, others the letter “P”, while others are left blank.
An “E” indicates that this function is enabled for all
authority levels. A “P” indicates that the function is
passcode protected. Look across the same row, and
notice that some of the cells in the authority level area
have the letter “E”. For each authority level in which
an “E” appears, this function is enabled (with a
passcode required). A blank cell in the E/P column
means that this function is unavailable for any
authority level.
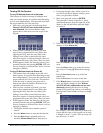
Under the heading Authority Level, you’ll refer to
columns 1-14, representing the fourteen authority
levels. Now look at the column labeled 1. Following
down this column, you’ll refer to that some cells are
blank while some contain the letter “E”, which stands
for enabled. Wherever there is an “E”, it means that
that function is available to users with an authority
level of 1.
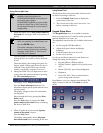
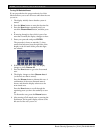
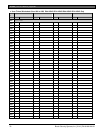
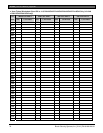
Passcode Worksheet
The passcode worksheet presents the information discussed previously onto one page, and also includes the user’s
ID number, assigned passcode, and his or her name.
An important piece of information included in the passcode worksheet is the listing of areas to which the user has
access, along with the authority level assignment for each of those areas.
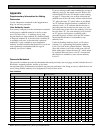
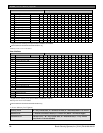
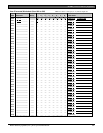
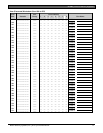
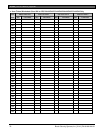
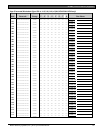
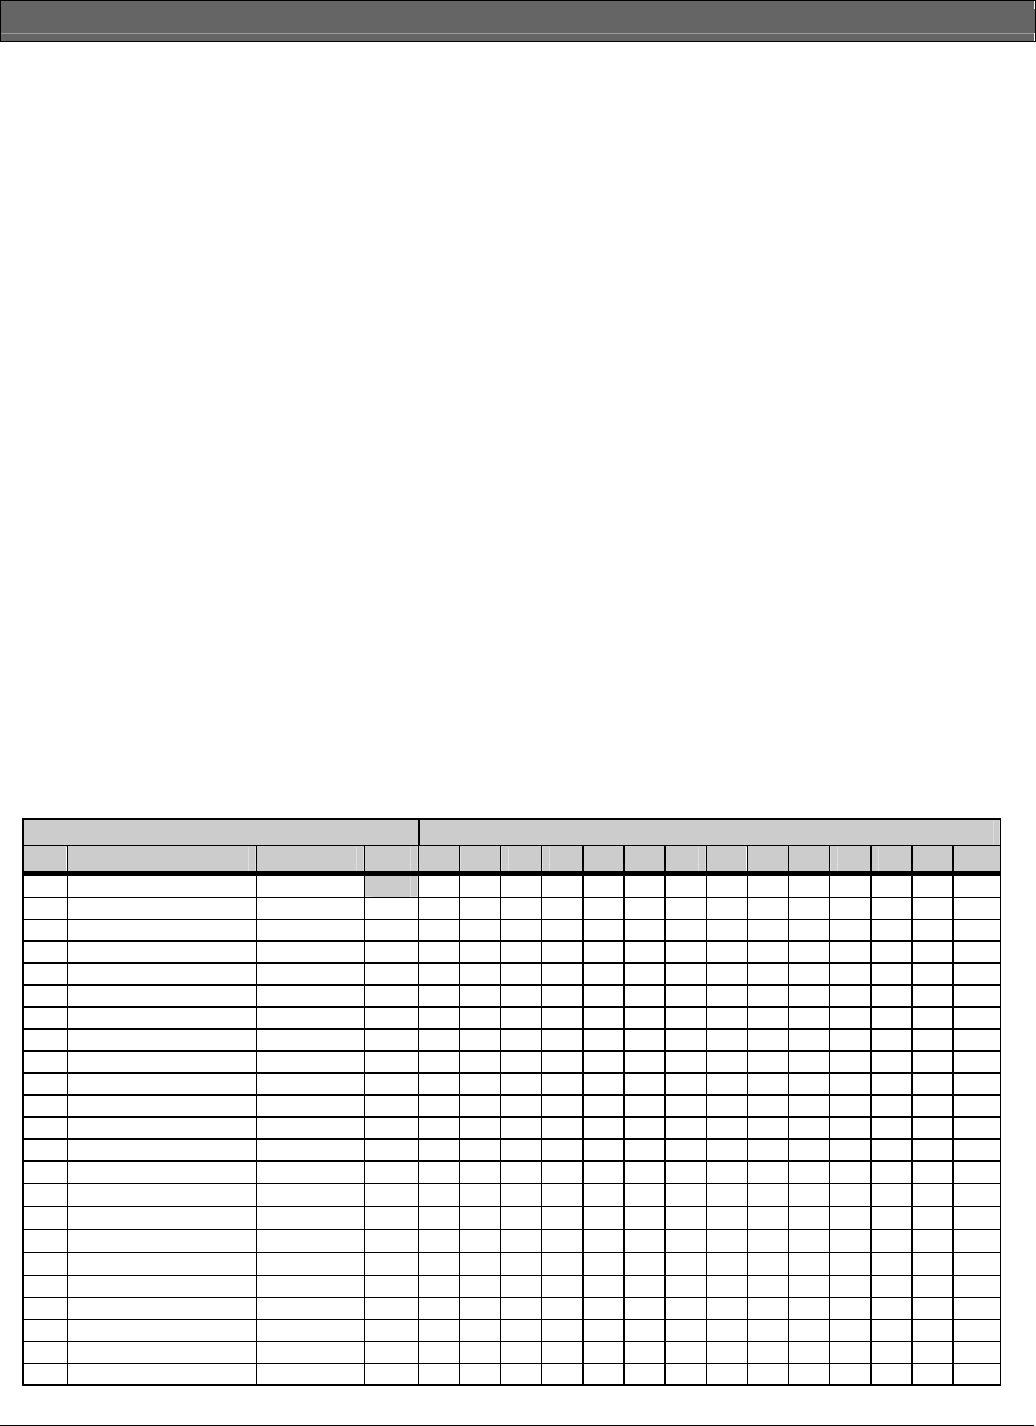
User Interface
Authority Levels
# Functions* Command E/P 1 2 3 4 5 6 7 8 9 10 11 12 13 14
1 Disarm
P
E E E E E
2 Master Arm Delay CMD 1 P E E E E E
3 Master Arm Instant CMD 11 E E
4 Perimeter Instant CMD 2 P E E E E
5 Perimeter Delay CMD 3 P E E E E
6 Watch Mode CMD 6 E E E E
7 Perimeter Part CMD 8 P E E E E
8 View Area Status P E E
9 View Memory CMD 40 E E E E
10 View Pt Status E E E E
11 Walk Test CMD 44 E E E
12 Fire Test CMD 58 P E E
13 Send Report CMD 41/42 P
14
Door Control
CMD 46 P E E
Cycle Door
E E E
Unlock Door
E E E
Secure Door
E E
37
Access Control Level
P E
15 Change Display CMD 49 E E
16 Change Time/Date CMD 45 E E
17 Change Passcode CMD 55 P E
18 Add User CMD 56 P E
19 Del User CMD 53 P E