


7-12
ACCESSORIES Magic-Pak: HW/HWC
SRM-HW/HWC 8/99
34961A001 Compressor Vibration Isolator
Kit
The 34961A001 spring/grommet kit is designed to isolate vibrations
common to most compressors away from the base of Magic-Pak units
and building walls.
Some types of wall construction will be especially susceptible to vibration
transmissions. In these instances, installers and building designers must
make special considerations for isolating vibration.
Designing and constructing walls and wall openings in a particular
manner to isolate vibration transmission is the recommended procedure
for dealing with these instances. However, if further vibration isolation is
necessary, the 34961A001 compressor vibration isolator kit should be
used.
For instructions and recommendations on designing and constructing
walls and wall openings, refer to the Magic-Pak Application Manual.
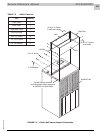
Installation
The Magic-Pak cooling chassis must be removed from the cabinet to
perform the following installation procedures. Refer to the Chassis
Removal section beginning on page 3-4 for instructions on proper chassis
removal.
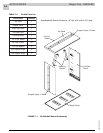
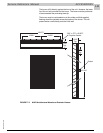
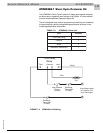
To install the 34961A001 kit:
1. Remove the factory-installed compressor mounting leg bolts from the
base of the compressor.
2. Lift the compressor of the base of the chassis by inserting a large
screwdriver or pry bar under the belly of the compressor.
3. Support the compressor by sliding a 3/4" to 1-1/4" thick wooden block
or suitable material underneath the compressor belly.
The copper refrigerant tubing connected to the compressor will
have some free movement. However, be careful not to kink or
damage the tubing. Loss of refrigerant or lack of proper unit
performance may result.
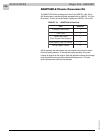
4. Remove the factory-installed rubber grommets from the compressor
mounting legs.
5. Install the top rubber spacer in the compressor mounting legs.
6. Insert the bottom rubber spacer into the bottom of the spring and
slide the spring between the upper spacer and chassis base.
7. Insert the metal sleeve through the top of the upper spacer, spring
and lower spacer.
8. Re-install the bolts removed in step 1.