


Service Reference Manual ACCESSORIES
7-7
SRM-HW/HWC 8/99
A242-1 Wall Sleeve Adaptor Kit
The A242-1 wall sleeve adaptor kit is designed to allow for the installation
of current 43" tall HW/HWC units into 48" tall wall sleeves (CA241 wall
sleeve kits). The CA241 wall sleeve kits were designed for use with HW/
HWC121, 181, 241 and 301 units manufactured during the late 1980’s.
The HW/HWC series 1 units were approximately 48" tall.
If replacement of the wall sleeve is not feasible, use of the A-242-1
adaptor kit creates an insulated block-off panel at the top portion of the
CA241 wall sleeve.
The adaptor kit also allows for easy mounting of the HW/HWC unit to the
taller sleeve.
Whenever it is necessary to convert a CA241 wall sleeve to current unit
dimensions, use of the A242-1 adaptor kit is required.
Inspection of Shipment
Upon receipt of equipment, carefully inspect it for possible shipping
damage. If damage is found, it should be noted on the carrier’s freight bill.
Damage claims should be filed with the carrier immediately. Claims of
shortages should be filed with the seller within five days.
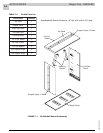
Wall Sleeve Adaptor Kit Assembly
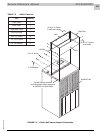
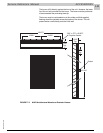
Once assembled, the A242-1 adaptor kit will form a rectangular box
approximately 4-7/8" tall with approximately 7/8" overlapping the front and
side of the top panel of the HW/HWC unit (see Figure 7-2 on page 7-9).
To assemble the adaptor kit:
1. Set top flanges of side and front panels on the floor or ground so that
they are resting flat. The screw holes through the side flanges of front
panel should align with the pilot holes in side panel.
2. Fasten two #8 x 1/2" screws in each side.
3. Place rear panel against the rear flanges of the side panels. The
screw holes of the rear panel should align with the pilot holes in the
side panel rear flanges.
4. The top and bottom flanges of the rear panel should be facing the
front panel. The five 1/4" pilot holes should be positioned towards the
bottom of the kit and the five oval screw holes should be positioned
towards the top of the kit.
5. Fasten two #8 x 1/2" screws at each end of the rear panel.