


7-8
ACCESSORIES Magic-Pak: HW/HWC
SRM-HW/HWC 8/99
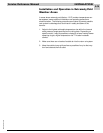
Attachment to HW/HWC
After assembling the kit, it is ready to be attached to the top of the HW/
HWC unit. To attach the kit to the HW/HWC unit:
1. Remove the two front screws (each side) that fasten the top panel
side flanges to the side panels on each side of the HW/HWC unit.
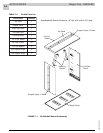
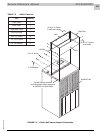
2. Place the adaptor kit on top of the HW/HWC unit. The five pilot holes
positioned towards the bottom of the kit’s rear panel should align with
the five oval screw holes in the HW/HWC mounting bracket (see
Figure 7-2).
3. Fasten the five 1/4" x 3/4" screws and washers through the unit
mounting bracket to the kit pilot holes.
4. Align the kit side panel oval screw holes to the screw holes in the side
of the HW/HWC unit.
5. Re-fasten the screws that were removed in step 1.
Installing the HW/HWC Unit
After the adaptor kit is fastened to the HW/HWC unit, the unit is ready to
be slid into the wall sleeve.
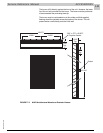
The top flange of the adaptor kit is designed to overlap the top of the wall
sleeve. The five 1/4" x 3/4" mounting screws included with the wall sleeve
kit can be fastened through the top flange of the kit into the turned-down
flange of the wall sleeve.
The HW/HWC unit must be slid all the way forward so that the outer
edges of the adaptor kit and HW/HWC unit are touching the outer flanges
of the wall sleeve.
The HW/HWC unit and wall sleeve must be weather sealed according to
the wall sleeve kit instructions, unit installation instructions or unit applica-
tion manual.
For further information on installing HW/HWC units, refer to the Installa-
tion section beginning on page 6-1.