


Tools Needed:
22
Winding Springs Continued...
extension is also recommended for added clearance
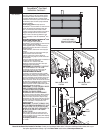
from the horizontal angle.), wind the spring by rotating
the winding shaft counter clockwise, while watching
either the black tooth on the ratchet wheel or the mark
on the winding shaft.
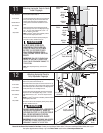
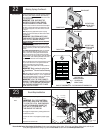
IMPORTANT: PAWL KNOB MUST BE
IN UPPER POSITION TO ADD/ REMOVE
REQUIRED NUMBER OF SPRING TURNS.
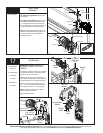
After 2-3 turns, remove the ratchet wrench and adjust
the cable on the left side. Ensure the cables are in the
first and second groove of the cable drums, as shown
in Step 21.
NOTE: Single spring application require no spring
winding on the left hand side, but cable tension needs
to be adjusted.
IMPORTANT: COUNTERBALANCE CABLE
TENSION MUST BE EQUAL ON BOTH SIDES
PRIOR TO FULLY WINDING SPRINGS.
SEE THE SPRING TURN CHART FOR THE REQUIRED
NUMBER OF TURNS:
For single spring applications: Return to the right
hand and continue winding the spring to the required
number of turns for your door. Place pawl knob in lower
position.
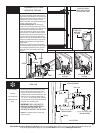
For double spring applications: Either use the black
tooth on the ratchet wheel for winding reference or
place a mark on the winding shaft and end bracket.
Place the ratchet with 5/8” socket onto the left hand
winding shaft end. To wind the spring, rotate the winding
shaft clockwise, while watching the black tooth on the
ratchet wheel or the mark on the winding shaft.
Rotate the winding shaft to the required number of turns
for your door. Then return to the right hand side and
wind the right hand spring to the required
number of turns. Place pawl knob in lower position on
both sides.
IMPORTANT: Mark number of spring turns
on TorqueMaster
®
Plus end bracket warning
tag.
NOTE: Since total turns to balance door can deviate from
SPRING TURN CHART values by ± 1/2 turn, adjustments
to the recommended number of turns may be required
AFTER rear hangers assembly is completed.
IMPORTANT! HOLD THE DOOR DOWN TO
PREVENT IT FROM RISING UNEXPECTEDLY IN
THE EVENT THE SPRING WAS OVERWOUND
AND
CAUTIOUSLY REMOVE VICE CLAMPS
FROM VERTICAL TRACKS.
Spring Turns
Door Height Spring Turns
(6’ - 0”) 14
(6’ - 3”) 14 - 1/2
(6’ - 5”) 15
(6’ - 6”) 15
(6’ - 8”) 15 - 1/2
(6’ - 9”) 15 - 1/2
(7’ - 0”) 16
(7’ - 3”) 16 - 1/2
(7’ - 6”) 17
(7’ - 9”) 17 - 1/2
(8’ - 0”) 18
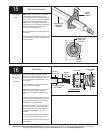
Number of Installed Spring Turns
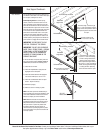
RATCHET PAWL
KNOB IN LOWER
POSITION
END BRACKET
RATCHET PAWL
KNOB IN UPPER
POSITION
END BRACKET
LOCATION FOR
MARKING NUMBER
OF INSTALLED
SPRING TURNS
BACK OF TORQUEMASTER
®
PLUS END BRACKET WARNING TAG
BLACK TOOTH
BLACK TOOTH
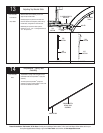
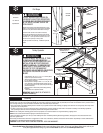
No
s
pace between
Ratchet
Pawl and Cabl
e
Dru
m
indicates
engagemen
t
Cab
le
D
rum
Ra
t
chet Pawl
ENGAGED SIDE VI
EW
No space bet
ween
Ra
t
chet Pawl and
Ca
ble
D
rum
EN
G
AGED
U
ND
ER
NE
A
TH
V
IEW
DI
S
ENGAGED SIDE VIEW
DI
S
ENG
A
GED
U
NDER
Use these Illu
st
r
at
ion
, in conjunct
i
on
with th
e Inst
ruct
i
ons on t
he o
ther
side of
this labe
l.
WARNING
R
ac
he
t Br
ack
et is un
der
EXTRE
ME SPRING
TENSIO
N
.
To avoid poss
ible
se
vere or
fatal
injury
,
DO
NO
T
re
m
ove
fasten
ers from ra
t
chet bracket
until
spring(s) are fully
wnwo
und.
To
safely unwi
nd spr
i
ng(s)
read
and
fo
l
low
t
he
directions in
t
he
installation inst
ru
c
ti
o
ns/owners
m
anual.
DO NOT
REM
O
VE THIS
TAG .
BLACK TOOTH
20
Please Do Not Return This Product To The Store. Contact your local Wayne-Dalton dealer. To find your local Wayne-Dalton dealer, refer to your
local yellow pages/business listings or go to the Find a Dealer section online at www.wayne-dalton.com
22
23
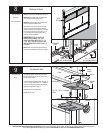
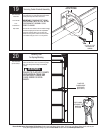
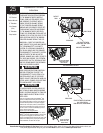
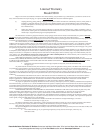
Drum Wrap Installation
None
Un-snap the drum wrap hinged latch and rotate
down.
IMPORTANT: PULL THE COUNTERBAL-
ANCE CABLE AWAY FROM THE HEADER
TO CLEAR THE LATCH. SIMULTANEOUSLY
SLIDE THE DRUM WRAP AGAINST THE
LAST RIB OF THE DRUM UNTIL THE 3
TABS ENGAGE THE THIRD RIB
Re-engage the hinged latch by rotating upward until
a distinct snap is felt.
Confirm the catch is fully engaged by lightly tugging
on it.
Repeat for the left hand side.
Drum Wrap
(Left Hand)
Tabs
Counterbalance Cable
Groove in
Drum
23
Tools Needed:
23
Hinged
Latch
Counterbalance Cable
Pull to clear latch
Last Rib
Drum
Wrap
Left
Cable
Drum
Secure Hinged
Latch
3 Catches
3rd Rib