


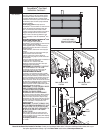

Cable Adjustment
Vice Grips
Pliers/Wire
Cutters
Flat Tip
Screwdriver
Step Ladder
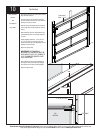
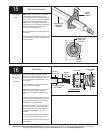
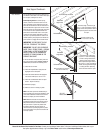
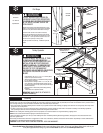
ENGAGE
D
No space between
Ratchet Pawl and
Cable Drum
ENGAGED UNDERNEATH VIEW
DISENGAG
DISENGAGED U
NDERNEATH VIEW
Use these Illustration, in conjunction
this label.
W
A
Rachet Br
a
EXTRE
M
TEN
To avoid pos
s
fatal injury,
D
O
fasteners fro
m
until sprin
g
wn
w
To
safely un
w
r
e
and follow the
installation ins
t
ma
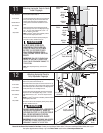
DO NOT REM
O
SET SCREW
FIRST AND SECOND
GROOVE
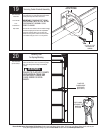
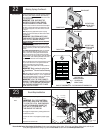
21
D
Use th
e
this la
b
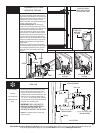
SET SCREW
PLIERS
COUNTERBALANCE CABLE
IN FIRST AND SECOND
GROOVE
CAM PEAK STRAIGHT UP
COUNTERBALANCE
CABLE
Starting on the right side, adjust the cable drum
assembly by rotating the drum until the set screw
faces directly away from the header. Torque tube
cam peak should be pointing straight up.
Loosen the set screw no more than 1/2 turn.
Ensure counterbalance cable is aligned and
seated in the first and second grooves and pull on
the end of the counterbalance cable to remove all
cable slack.
Snug the set screw, and then tighten an additional
1-1/2 turns. Measure approximately 6” of cable
and cut off excess cable. Insert end of cable in
hole of cable drum.
Repeat for left hand cable drum assembly.
IMPORTANT: ENSURE THE CABLE IS
ALIGNED AND SEATED IN THE FIRST
AND SECOND GROOVES OF THE CABLE
DRUM PRIOR TO WINDING SPRINGS.
NOTE: This illustration shows the right hand
TorqueMaster
®
Plus cable drum assembly, left
hand cable drum assembly is symmetrically
opposite.
23
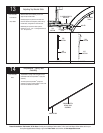
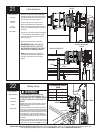
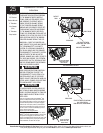
Winding Springs
IT IS RECOMMENDED THAT LEATHER
GLOVES BE WORN WHILE WINDING THE
TORQUEMASTER
®
PLUS SPRINGS. FAILURE
TO WEAR GLOVES MAY CAUSE INJURY TO
HANDS.
Double check to ensure the counterbalance cable is
aligned in the first and second groove of the cable
drum (see Step 21).
There are two methods for counting the spring turns
as you wind. One method is to identify the black tooth
on the ratchet wheel inside of the end bracket. When
the wheel makes one revolution and the tooth returns
to its starting point, one turn has been made. The
other method is to make a mark on the winding shaft
(or socket) and end bracket, and count your turns in
this manner.
Starting on the right hand side. Turn the pawl knob on
the end bracket to the upper position. Using a ratchet
wrench with a 5/8“ 16mm socket (NOTE: A 3” 76 mm
23
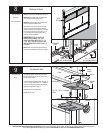
Tools Needed:
22
21
Tools Needed:
19
Please Do Not Return This Product To The Store. Contact your local Wayne-Dalton dealer. To find your local Wayne-Dalton dealer, refer to your
local yellow pages/business listings or go to the Find a Dealer section online at www.wayne-dalton.com
WARNING
No
spa
ce
b
etwe
en
Ratchet
Pawl
a
nd
Cable
Drum
in
d
ica
tes enga
ge
m
ent
Cable
Drum
Ratchet Pawl
ENGAG
ED SIDE VI
E
W
No
spa
c
e
b
etween
Ratc
het Pawl
an
d
Cable
Drum
ENGAGE
D UNDE
R
NE
AT
H
V
IE
W
DI
SENGAGED
SID
E VIEW
DI
SENGAGED
U
ND
E
R
NE
A
T
H VI
E
W
Use
t
hese
Illu
st
r
at
i
on,
in conjun
ction
w
ith
t
he In
st
r
uctions on
t
he
other sid
e of
this l
ab
e
l.
WA
RNING
R
ac
h
e
t
B
r
a
c
k
e
t
i
s
u
n
d
e
r
E
X
TR
E
M
E
S
P
R
IN
G
T
E
N
S
IO
N
.
T
o
a
vo
i
d
p
o
s
si
b
le
s
e
v
er
e
o
r
fatal
in
jury
,
D
O
N
OT
rem
o
v
e
fas
ten
e
rs
fro
m ratc
h
e
t
b
ra
c
k
e
t
u
n
ti
l
sp
ri
n
g
(s) a
re full
y
w
n
w
o
u
n
d
.
T
o
s
a
fel
y
u
n
w
ind
s
p
rin
g
(s
)
rea
d
a
n
d
fo
l
low
th
e
d
ir
e
c
tio
n
s i
n
th
e
inst
a
llati
o
n
ins
tru
c
ti
o
n
s
/own
e
rs
m
a
n
u
a
l.
D
O
N
OT
R
E
MOVE
T
H
IS T
A
G.
3”
EXTENSION
END
BRACKET
RATCHET
WRENCH
5/8” SOCKET
MARKS
BLACK TOOTH
RECOMMENDED SPRING
TURNS
Door Height Spring Turns
6’-5” 15
7’-0” 16
8’-0” 18
Ratchet Wrench
5/8” Socket
3” Extension
Gloves
Step Ladder