


Pre Power-Up Checks
Once the system is installed, but prior to
powering-up, give the system one final check to
ensure that:
1. The wiring conforms to the requirements
de taile d in th is ma nual and th at al l
interconnections are correct (A to A, B to B
etc.).
2. All system cables are kept clear of mains
supply cables, telephone cables and R.F.
cables. It is recommended that cable ties be
used to keep cables separated.
3. Verify that maximum cable lengths and
resistance's are not exceeded.
4. Mains power supply cables to the system are
connected to an un-switched fused spur.
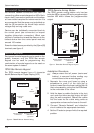
Initial Power-Up
To power the system for the first time:
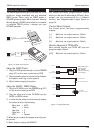
1. Place a small screwdriver blade between the
pins on the control panel PCB, marked
“FACTORY RESET”. This will ensure the factory
default parameters are set, see page 21.
2. Switch on the 240V mains supply and remove
the screwdriver blade from the factory restarts
pins.
3. Check that the control panel and remote
keypads show “LID TAMP”. The internal sounder
and remote keypad sounders will operate.
4. Enter the engineers passcode (default 1234) to
silence the sounders.
5. Connect the standby battery.
6. Enter the engineers passcode (default 1234) to
select engineer's menu 1. Once you have
completed the “Power-up Checks” you can
continue to program the system.
Power-Up Checks
When the initial power-up checks have been
completed, check the following:
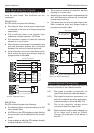
1. Switch off the 240V mains supply and measure
the DC voltage at each remote keypad and
ensure the voltage is greater than 11V whilst
the system is powered from its standby battery.
2. Switch on the 240V mains supply and measure
the DC voltage between the mains earth
connection and AUX +12V. Then measure the
DC voltage between the mains earth
connection and AUX 0V. In both cases the
measurement should be 1V or less. If the
voltage is greater than 1V, the system has an
“Earth Fault” and all cables should be checked
for isolation to Earth.
20
System Installation TS690R Installation Manual