


Convector 460/560PTR - 51 - ©Rinnai
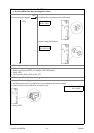
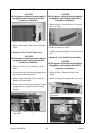
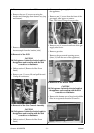
d. Disconnect connector from PCB.
e. Remove the two (2) screws securing the
bracket and disengage from burner assy (top
and bottom).
f. Remove one (1) screw to release the
thermocouple from the bracket (side).
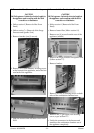
10.Removal of the PCB
CAUTION
240 Volt exposure. Isolate the electrical supply to
the appliance and reconfirm with the neon
screwdriver or multimeter.
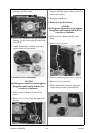
a. Follow section 3 (Removal of the Front
Panel).
b. Remove one (1) screw, lift and pull forward.
Unclip all connectors.
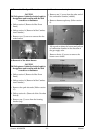
11.Removal of the Gas Control Assembly
CAUTION
240 Volt exposure. Isolate the electrical supply to
the appliance and reconfirm with the neon
screwdriver or multimeter.
a. Follow section 3 (Removal of the Front
Panel).
b. Disconnect the gas supply hose at the rear of
the appliance.
c. Remove one (1) screw from the front of the
gas supply tube upper to remove.
Note: Don’t lose O-rings from gas tube.
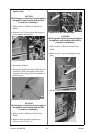
d. Remove two (2) screws from front of the gas
supply tube lower.
e. Remove gas tube.
f. Remove the gas control securing screws
(three (3) from the rear of the appliance).
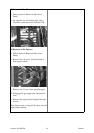
12.Removal of the Heater Filter
CAUTION
240 Volt exposure. Isolate the electrical supply to
the appliance and reconfirm with the neon
screwdriver or multimeter.
a. Remove the bottom screw (large) and pull the
filter in an upwards direction to remove.