


41
START-UP
Pre Start-up
Filling System (Heating Boilers)
Fill system with water. Purge all air from the system.
Lower system pressure. Open valves for normal sys-
tem operation, and fill system through feed pressure.
Manually open air vent on the compression tank until
water appears, then close vent.
Air Purge (Domestic Hot Water
Heaters)
Purge all air from system before heater operation. This
can be normally accomplished by opening a down-
stream valve.
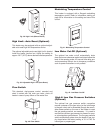
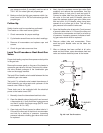
Raypak offers an optional air vent valve for the MVB
heaters which can be installed directly into the inlet
side of the header to ensure that air is purged from the
system. This option also includes an adapter to allow
the air vent to be piped (in the field) to a suitable drain
as re-quired by the jurisdiction having authority.
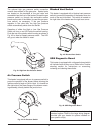
Venting System Inspection
1. Check all vent pipe connections and flue pipe ma-
terial.
2. Make sure vent terminations are installed per code
and are clear of all debris or blockage.
For Your Safety
This appliance has a hot surface igniter. It is equipped
with an ignition device which automatically lights the
burners. Do not try to light the burners by hand.
WARNING: If you do not follow these instructions
exactly, a fire or explosion may result causing
property damage, personal injury or loss of life.
B
EFORE OPERATING, smell all around the appliance
area for gas. Be sure to smell near the floor because
some gas is heavier than air and will settle on the floor.
W
HAT TO DO IF YOU SMELL GAS:
•
Do not try to light any appliance.
• Do not touch any electrical switch; do not use any
telephone in your building.
• Immediately call your gas supplier from a neigh-
bor’s telephone. Follow the gas supplier’s
instructions.
• If you cannot reach your gas supplier, call the fire
department.
• Use only your hand to push in or turn the gas con-
trol knob. Never use tools. If the knob will not turn
by hand, do not try to repair it, call a qualified serv-
ice technician. Forced or attempted repair may
result in a fire or explosion.
• Do not use this appliance if any part has been
under water, immediately call a qualified service
technician to inspect the appliance and to replace
any part of the control system and any gas control
which has been under water.
• Check around unit for debris and remove com-
bustible products, i.e. gasoline, etc.
Pre Start-up Check
1. Verify the heater is filled with water.
2. Check system piping for leaks. If found, repair
immediately.
3. Vent air from system. Air in system can interfere
with water circulation.
4. Purge air from gas line to heater.
Initial Start-up
Required tools
• (1) 12-0-12 (24” scale) U-tube manometer
• (2) 6-0-6 (12” scale) U-tube manometer
• Screwdrivers (assorted sizes and shapes)
• (1) Crescent wrench (8” or 10”)
• (1) Multi-meter
• (1) Amp probe
(Metric Allen wrenches will be required for servicing
the gas valve, but not during start-up)
NOTE: Digital manometers are not recommended.
CAUTION: An air vent valve should be installed at
the highest point in the system for proper operation.
If water piping is located higher than the header, the
air vent valve should be relocated to the highest
point in the installed system.
NOTE: The following steps must be performed by a
f
actory-trained technician.