


523
FX-301-F
PRECAUTIONS FOR PROPER USE
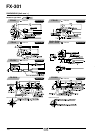
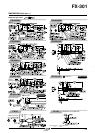
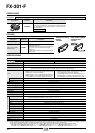
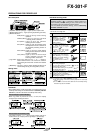
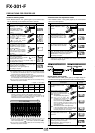
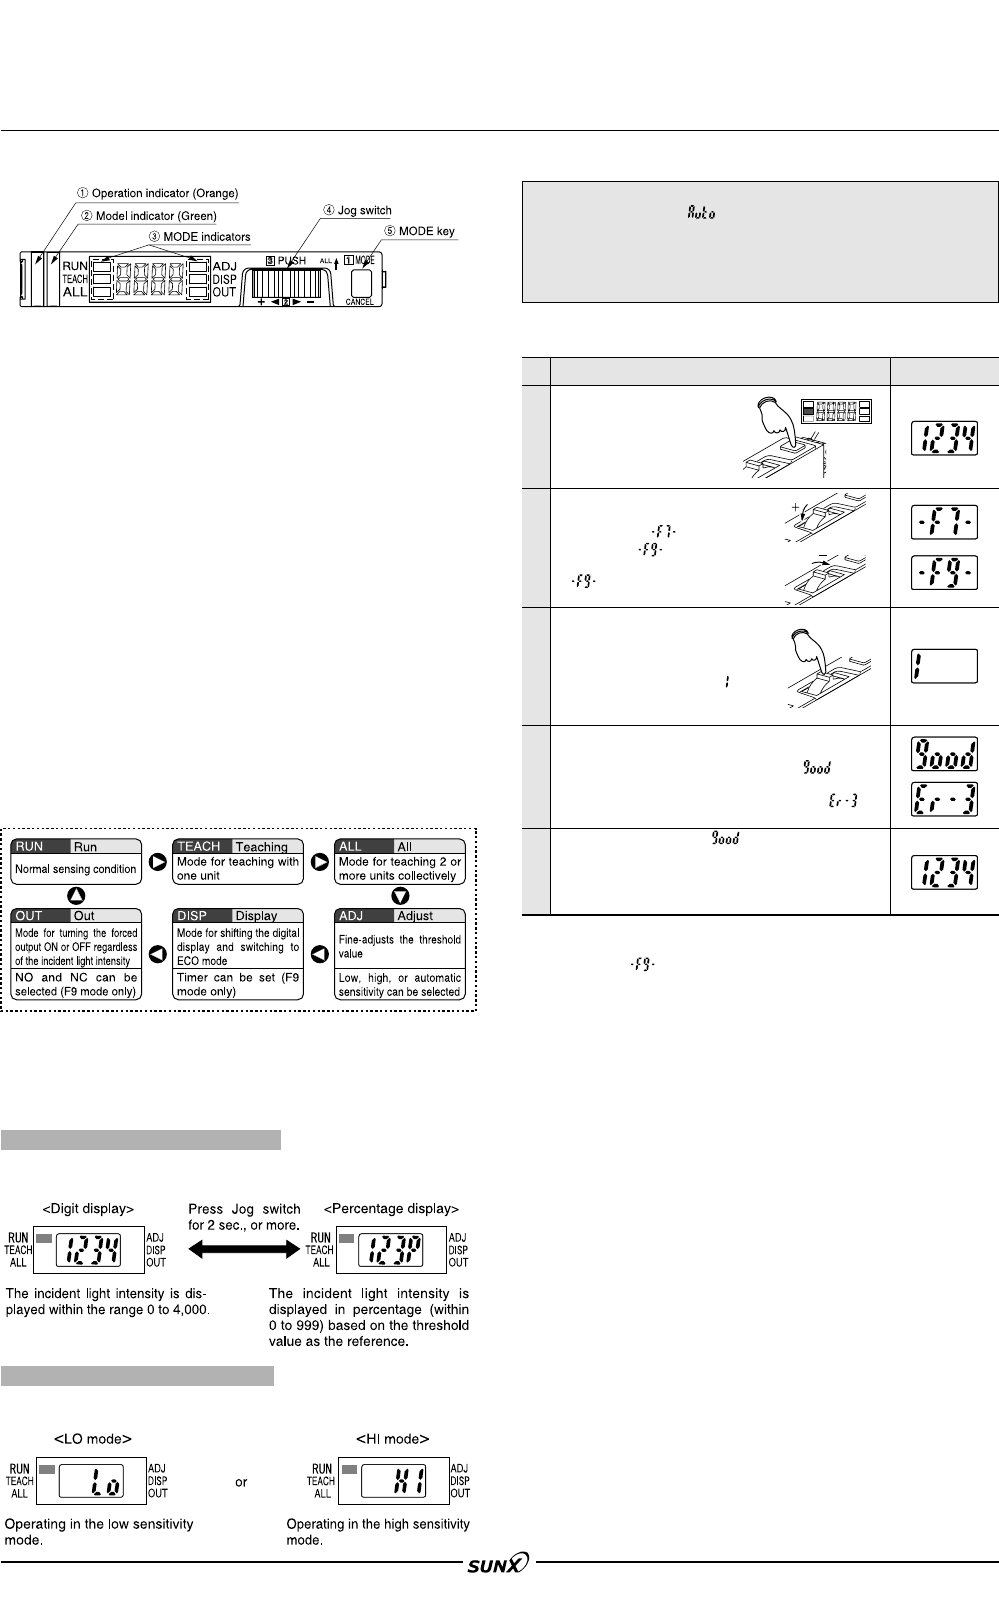
Individual teaching modePart description
• The sensitivity selection function is set to the automatic
sensitivity setting ( ) at the time of factory shipment. In
case sensitivity selection setting is done, make sure to carry
out ‘teaching’ after the sensitivity selection setting.
• For the sensitivity selection setting, refer to ‘Sensitivity
selection function’ on p.525.
Insert Leak detection fiber
(FD-F7Ⅺ) or Liquid
detection fiber (FT-F9Ⅺ).
Press MODE key to light
up MODE indicator /
TEACH (yellow).
Turn the jog switch to ‘
ם’or
‘
מ’ side to set to either Leak
(F7) mode ( ) or Liquid
(F9) mode ( ).
In case Liquid (F9) mode
( ) is set, the model
indicator (Green) lights up.
Press Jog switch in no-leak
condition with Leak detection
fiber (FD-F7Ⅺ) or no-liquid
condition with Liquid detection
fiber (FT-F9Ⅺ). Then, ‘ ’ on
the display moves from left to
right.
When teaching is accepted, the result of threshold
value setting is displayed.
• In case stable sensing is possible: ‘ ’ on the
display blinks three times.
• In case stable sensing is not possible: ‘ ’ on
the display blinks. (Note 1)
If the teaching result is ‘ ’, the sensor returns to
RUN mode automatically and the incident light
intensity is shown on the display.
MODE indicator / RUN (green) lights up.
The setting is complete.
• When MODE indicator / TEACH (yellow) lights up, threshold value
can be set on a single unit.
1
2
3
4
5
Step
Description Display
Notes: 1) For details, refer to ‘Error indication’ on p.526.
Notes: 2) The initial setting at the time of factory shipment is Liquid (F9)
mode ( ).
Notes: 3) Do not move or bend the fiber cable after the sensitivity setting.
Detection may become unstable.
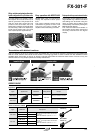
1
Operation indicator (Orange)… Lights up when output is ON.
2
Model indicator (Green)… Lights up during liquid setting (F9 mode).
3
MODE indicators…
RUN (Green) : Lights up during normal sensing
operation.
TEACH (Yellow): Lights up when the individual
teaching mode is selected.
ALL (Yellow) : Lights up when the collective
teaching mode is selected.
ADJ (Yellow) : Lights up when the threshold value
fine adjustment mode is selected or
the sensitivity switching function is
activated.
DISP (Yellow): Lights up when the digital display
setting mode is selected or the timer
function is activated.
OUT (Yellow) : Lights up when the forced output
mode is selected or the NO / NC
switching function is activated.
4
Jog switch... Moving this switch in the ‘
ם’or ‘מ’ direction,
allows different items to be viewed for selection
and pressing the switch then confirms the selected
setting.
5
MODE key... This key is used to select operating modes and to
cancel settings during the configuration process.
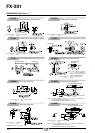
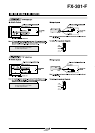
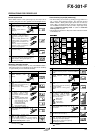
Setting items
How to change to ‘percent display’
RUN Mode
•
When MODE indicator / RUN (green) lights up, the display setting or the
sensitivity select setting can be checked. Refer to ‘Sensitivity selection
function’ on p.605 for further details of sensitivity select
setting.
•
When Jog switch is pressed for 2 sec., or more, the display
changes as per the diagram below.
How to check the sensitivity state
•
If Jog switch is turned to ‘ם’ or ‘מ’ side, the present sensitivity state can be
confirmed. After 2 sec., the display returns to ‘digit display’ or ‘percent display’.
08/2005