


69
PC and Mac Client Software for Remote Viewing
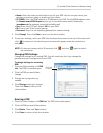
Changing Bitrate Speed
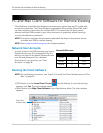
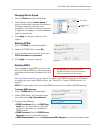
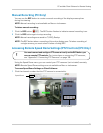
1 Click the Bitrate tab from Setup Mode.
Bitrate tab
Select bitrate
speed
Click Apply
2 Under Bitrate, select a bitrate speed. A
higher bitrate speed improves the quality of
the video stream but requires more
bandwidth. If the video is taking a long time
to update or is choppy, it is recommended to
select a lower bitrate.
3 Click A
pply to save your settings to the
system.
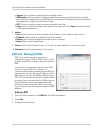
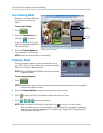
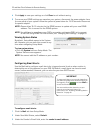
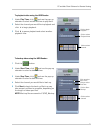
Enabling PPPoE
PPPoE tab
1 Click the PPPoE tab from Setup Mode.
2 Under the PPP
oE Status, select ON.
3 In the corresponding text fields, enter your
PPPoE Username and
password.
4 Click A
pply to save your settings.
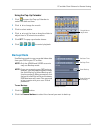
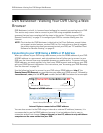
Enabling DDNS
ATTENTION: You
MUST
enter your
DDNS information
on the local network
before attempting remote access.
Lorex provides a free DDNS service for use
with your DVR. A DDNS account allows you to
set up a permanent web-site address for your
DVR.
Visit http://www.lorexddns.net to register for Lorex’s free DDNS service. For more details
on setting up a free Lorex DDNS account, see “Step 2 of 4: Create a DDNS Account” on
page 55.
NOTE: Y
ou must register for Lorex’s free DDNS service prior to configuring DDNS settings.
T
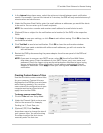
o change DDNS settings:
Enter only the first portion of your domain name
1 Click the DDNS tab from Setup Mode.
2 Under DDNS Sel
ect, click the drop-down
menu and select http://lorexddns.net
3 Configure the following:
• DDNS User Name: Enter
the DDNS User
Name from the confirmation email that
was sent to you after you created your
DDNS account.
• DDNS Password: Ent
er the DDNS Device
Password from the confirmation email.
• DDNS Domain Name: Ent
er the Domain name/URL Request from the confirmation email.