


61
Setting up your DVR for Remote Connectivity
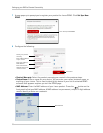
Advanced Networking Configuration (Optional)
The following steps are recommended to ensure your DVR is secure and accessible at all
times, even in the event of a power failure. Please note that some of the steps below
require you to reconfigure the settings for your DVR in the Client Software.
• As
sign a fixed IP address to your DVR. A fixed IP address will allow your DVR to keep the
same IP address in the event of a power failure or if you restart your router. If your DVR’s IP
address changes, you may lose your port forwarding rules. See “Appendix B: Assigning a Fixed
IP to your DVR” on page 104.
• C
hange your system passwords and remote access passwords to something other than the
defaults. See “Managing Passwo
rds” on page 28. I f y o u c h a n g e y o u r r e m o t e a c c e s s p a s s w o r d s ,
you must update your DVR List in the Client Software to use the new password(s).
• C
hange your HTTP Port to
any desired port
other than port 80. The port must not be blocked
by your Internet service provider. For details, see “Changing the HTTP Port” on page 46. If you
change your HTTP port, port forward the newly selected port and update your DVR List in the
Client
Software for the newly selected port.
• Connect y
our DVR, router/modem, and cameras to an Uninterruptible Power Supply (UPS).
A UPS has an internal battery that will keep your equipment running in the event of a power
failure. The amount of time that a UPS can keep your equipment running will depend on the
model of UPS and the devices connected.
NOTE: In
order to maintain remote connectivity to your DVR during a power failure, you
must also connect your router and modem to the UPS.