


15
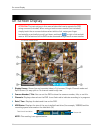
On-screen Display
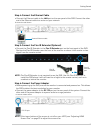
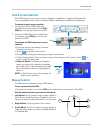
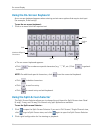
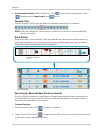
6 Toolbar: Move the mouse to the bottom of the screen to view the toolbar. Click these buttons
to access the menus and control the DVR.
NOTE: Additional buttons are shown in some screens.
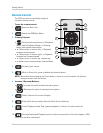
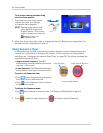
• : Click to open the Split-Screen Selector; In Full Screen / Single Channel mode, click to
open Split-screen view.
•
: Click to open the Main Menu. See “Using the Main Menu” on page 30.
•
: Click to move cursor left in menus.
•
: Click to move cursor right in menus.
•
: From Viewing mode, click to open Playback mode. Click to play / pause video.
•
: Click to rewind / increase rewind speed (only available during playback).
•
: Click to fast forward / increase fast forward speed (only available during playback).
•
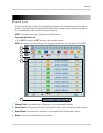
: Click to open the Event List. See “Event List” on page 21.
•
: Click to begin Sequence view. In Sequence view, the DVR automatically switches
between connected cameras in Full Screen / Single Channel view. Click
to exit Sequence
view.
•
: Click to turn the On-Screen Display on / off.
•
: Click to go back / exit menus.
•
: Click to take a screenshot of the active display (live viewing or playback).
NOTE:
USB flash drive (not included) must be connected. For more details, see “Taking Screenshots”
on page 26.
• : From the Event List, click to delete a selected video file.
NOTE:
Be careful when clicking the Trash icon—there is no confirmation for deletion and you cannot
undo the action.
• : Click to access PTZ controls.
NOTE:
PTZ camera(s) must be connected. For instructions, see “Appendix C: Connecting PTZ
Cameras” on page 108.
• : Click to close the on-screen keyboard and cancel current entry.