


Diagnostics and Troubleshooting
September 2000 5-13
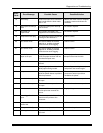
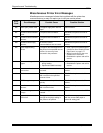
The vacuum reduction
insert is damaged and
causing noise in the printer.
• The vacuum reduction insert was
not installed properly and has
become damaged.
• A damaged vacuum reduction
insert was installed.
Properly install an undamaged vacuum
reduction insert.
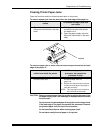
The paper is being creased
and crumpled when
feeding into the printer.
The lead edge of the paper has not
been squarely trimmed and is being
pulled at an angle or unevenly or it is
being loaded at an angle into the
rollers.
1. Pull the paper out of the printer from the
paper supply area.
2. Recut the lead edge of the paper squarely.
3. Reload the paper. Wait for a message and
then push the paper evenly and slowly.
NOTE: If necessary, remove the curl in the
paper by rolling the paper on an empty
core in the opposite direction of the
curl.
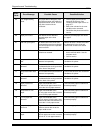
The paper jams repeatedly. Small strips or pieces of paper are
caught in the printer from the
previous paper jam.
Remove small pieces of paper from the printer.
The prints have not been
cut correctly.
Strips of paper are caught in the
knife area.
Remove the strips of paper from the knife area.
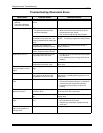
The borders on the prints
are not the right size.
The slug width is not correctly set. Reset the slug width, see “Selecting the Slug
Width for the Paper” on page 3-18.
The host software’s image
positioning is not correct.
Refer to the instructions for the host software.
The page start parameter may be
incorrect.
See the information for “Page Starts” in
the“Setting the Page Starts Value” on
page 3-19.
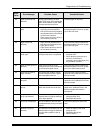
The edge(s) of the prints
are damaged and the
image is skewed.
• The paper is not loaded correctly
in the paper cassette.
• The paper cassette clamp is not
secured correctly.
• The paper cassette was not
aligned with the pin when
installed on the shelf.
• The paper cassette was not
picked up or carried correctly and
the paper has “telescoped”.
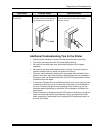
1. Reload the paper in the paper cassette.
2. Position the paper cassette on the pin of the
shelf.
3. Close the cassette clamp to lock the paper
cassette into position.
NOTE: Always carry the paper cassette with
two hands to prevent the paper from
sliding to one end or “telescoping”.
4. When loading paper into the printer:
• cut the corners of the lead edges of the
paper at a 45
o
angle
• wait for a message to feed
• push the paper slowly into the printer’s
rollers, keeping the paper taut between
the cassette and the rollers.
NOTE: Push the paper evenly so that the
paper remains flat and does not buckle
and do not push the paper too hard
against the paper alignment guide.
Observation Possible Cause Possible Solution