


52C,P
SERIES
10
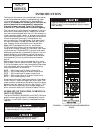
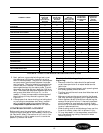
TOOLS NEEDED
The following list includes the recommended tools,
devices, and cleaning solutions for use in cleaning the
52C,P unit and components.
MONTHLY CLEANING
■
AIR FILTERS
— The indoor and vent air filters
should be cleaned once per month. Filters that are not
cleaned become clogged and will restrict airflow. This
may lead to major component damage. If a filter
becomes torn, has holes, or other damage, replace it
with a new one. Replacement filters are available
through Carrier Finished Goods and Carrier Replace-
ment Component Division.
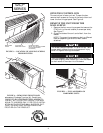
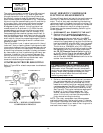
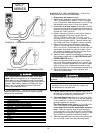
■
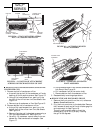
CLEANING THE INDOOR AIR FILTER
— Two air
filters are located in the unit’s front panel. To remove
each filter simply grasp each filter handle with both
hands and gently pull the filter up and away from the
unit. See Figure 21.
■
REPLACING THE INDOOR AIR FILTER
—
Remove the indoor air filter as detailed in Cleaning
the Indoor Air Filter. If damaged, use a filter replace-
ment with the Carrier Part No. AIR-FILTER-10PK,
available through Carrier Finished Goods and Carrier
Replacement Component Division.
NOTE: Both filters are completely interchangeable.
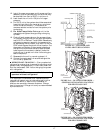
■
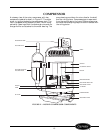
CLEANING THE OUTDOOR AIR VENT FILTER
1. Remove the unit chassis from wall sleeve as
described in the General Disassembly section of
this manual. Refer to Remove the Unit from
the Wall Sleeve section.
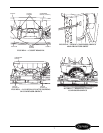
2. Swing open vent door. The filter is located directly
behind the vent door. See Figure 22.
3. Once the filter is accessed, it may be cleaned using
either a vacuum cleaner, or a soft bristle brush
and a small amount of mild dish detergent. If
detergent is used, remove detergent residue with
a gentle, clean water stream. Allow the filter to
air dry.
■
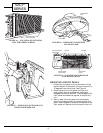
REPLACING THE OUTDOOR AIR VENT FILTER —
If vent filter requires replacement:
1. Open vent door to access vent filter.
2. Remove vent door from hinges.
3. Using a small flat head screwdriver, pry the filter
from the partition.
4. Replace vent filter using Carrier Part No.
52CQ500144.
5. Reverse Steps 1-3 to reattach vent door.
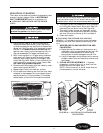
■
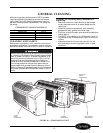
CHASSIS
Occasional cleaning of the exterior surfaces of the
PTAC unit optimizes the unit’s appearance and
removes particles that may enter the air system. See
Figure 23. Mild detergents clean and reduce electro-
static charges on the plastic components of the PTAC
unit.
Use a clean cloth or brush to gently wipe exterior sur-
faces. Be careful not to push dirt or other fibers into
the unit’s interior components. Accessible wall sleeve
surfaces should also be wiped clean.
Vacuum Cleaner with Crevice Tool Attachment,
or Soft Plastic Bristle Brush
Mild Household Detergent
Phillips Head Screwdriver
5
/
16
-in. Nut Driver
Flat Head Screw Driver
Needle Nose Pliers, 90° Bend
Lifting Device (or another person for assistance)
Tank Sprayer (Part No. P9021001) or
Trigger Spray Extension Tube (Part No. P9029000)
Compressed Air Tank
Clean Water Supply
Indoor Air Filter Replacement
(Part No. AIR-FILTER-10PK)
Vent Air Filter Replacement (Part No. 52CQ500144)
Condenser Coil Cleaning Solution (Part No. P9020501)
Evaporator Coil Cleaning Solution (Part No. P90221001)
10-in. by 29-in. Piece of Clean Cardboard
3% Solution of Hydrogen Peroxide in Spray Bottle
Clean Cloth
Safety Glasses
Protective Gloves