


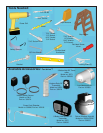
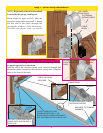
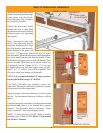
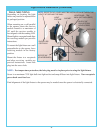

Attach the loose disconnect cable
(located in opener hardware bag)
to the opener with the S-hook.
Close both ends of the S-hook to
lock assembly together.
Thread the disconnect cable
through the hole in right hand
fl ag bracket and remove all slack
between opener and right hand
fl ag bracket.
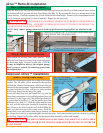
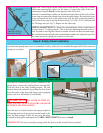
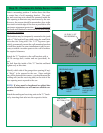
Mark a location on the right
jamb, 6 feet above the fl oor to
mount the handle bracket. Align
top of the bracket with the mark.
Fasten bracket to the jamb with
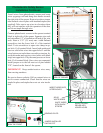
(2) 1/4 x 1-1/2” lag screws. Start the #6-20 x 1/2”screw
into the handle. Thread the disconnect cable through the
top of the handle bracket and then the handle. Locate
the handle in full upper position of handle bracket. Then
remove all cable slack between the opener and the top
of the handle bracket. Tighten #6-20 x 1/2” screw into
the handle until snug, and then tighten screw an addi-
tional 1 to 1-1/2 turns to secure cable to handle. Trim
off excess cable from bottom of the handle.
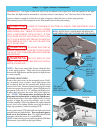
NOTE: It is recommended that 1/4” lag screw loca-
tion be pilot drilled using 1/8” drill bit.
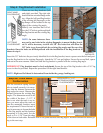
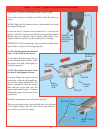
CAUTION: Pull cable only enough to remove the
cable slack. Pulling the cable more could cause opener
to disconnect from the torque tube.
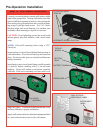
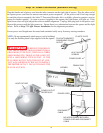
Apply emergency disconnect label next to the mounted
bracket. Use mechanical fasteners if adhesive will not
adhere.
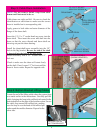
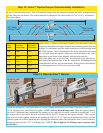
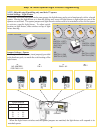
Using the emergency disconnect, pull disconnect handle
downwards and place it in the manual door operated
position. Use disconnect label for reference. Motor
will be rotated 90° from its packaged position.
NOTE: If motor does not pivot 90°, Refer to trouble-
shooting pages 34 and 35 of the iDrive™ Instructions
and Owner’s Manual.
14
Step 14: Disconnect Installation
DISCONNECT
CABLE
S-HOOK
RIGHT HAND
FLAG BRACKET
OPENER
HANDLE
BRACKET
#6-20 X 1/2”
1/4 X 1-1/2”
LAG SCREW
MOUNTED
BRACKET
EMERGENCY
DISCONNECT
CABLE
CABLE
HANDLE
MANUAL DOOR OPERATED POSITION
(To bottom
of door)
6’