


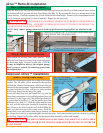
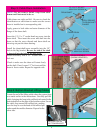
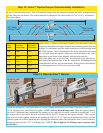
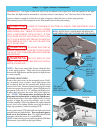

Push the outer torque tubes in until they are touching the opener. Be sure that the snap buttons are not engaged
in any of the outer tube holes. This will make the torque tube the shortest in length and allow enough room to
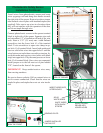
get the tubes into the drums. The torque tube can be adjusted to fi t a door width of 8’ to 10’ in 6” increments.
See fi gure above.
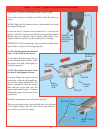
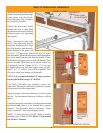
Lift the iDrive™ opener/ torque tube assembly up to the drums. It may be
necessary to disconnect the motor from the torque tube to get the tube into
the drum. To disconnect, pull the cable coming out of the top right hand
side of the opener. This will disconnect the motor and allow the torque
tube to rotate inside the opener. Align one end of the tube to the “cam”
shaped hole in the drum. Once aligned, slide the tube into the
cable drum. Make sure it is all the way into the drum. Now take the op
posite end of the tube and slide it into the other drum. Extending the tube
so that the tube is all the way in both drums. When correct, the snap but-
tons will engage the set of holes for your door width.
13
SNAP BUTTONS
ENGAGED
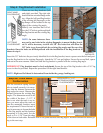
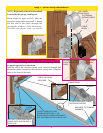
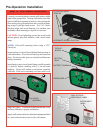
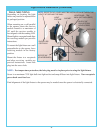
Locate the spring pad. The spring pad is a vertical running board above the center of the door. Remove
(2) 1/4-20 fl ange nuts from bottom of opener. NOTE: Do not discard fl ange nuts. Place the support bracket
(in idrive™ hardware bag) underneath the opener, to the right side of motor, centered on spring pad. Level
the torque tube to the top of the door section with the idrive™ resting on the support bracket. Once torque
tube is level, secure support bracket to the spring pad with (2) 1/4 x 2” lag screws(operator hardware). Lift and
slide the opener over the support bracket, aligning the mounting studs with the bracket slots. Loosely fasten to
mounting studs with the (2) 1/4-20 fl ange nuts.
NOTE: Do not tighten 1/4-20 fl ange nuts to opener studs
at this time.
Step 12: idrive™ Opener/Torque Tube Assembly Installation
10’-0”
8’-0”
1
2
3
1
2
3
Door
Width
Left Hand
Torque Tube
Right Hand
Torque Tube
8’-0” hole 1 hole 1
8’-6” hole 2 hole 1
9’-0” hole 2 hole 2
9’-6” hole 3 hole 2
10’-0” hole 3 hole 3
LEFT HAND
TORQUE TUBE
RIGHT HAND
TORQUE TUBE
MOTOR
OPENER
SPRING PAD
SUPPORT BRACKET
TORQUE TUBE
PARALLEL AND
LEVEL WITH
TOP OF DOOR
(2) 1/4 X 2” LAG SCREWS
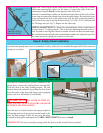
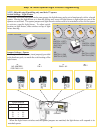
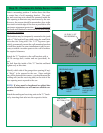
Step 13: Secure idrive™ Opener
MOTOR
OPENER
SPRING PAD
TORQUE TUBE
PARALLEL AND
LEVEL WITH
TOP OF DOOR
(2) 1/4-20 FLANGE HEX NUTS