


34 PTAC-SVX01C-EN
Maintenance
4. Start the vacuum pump and
open the shut-off valve to the
high vacuum gauge manifold
only. After the compound gauge
(low side) has dropped to
approximately 29 inches of
vacuum, open the valve to the
vacuum thermocouple gauge.
See that the vacuum pump will
bank-off to a minimum of 50
microns. A high vacuum pump
can only produce a good vacuum
if its oil is not contaminated.
5. If the vacuum pump is working
properly, close the valve to the
vacuum thermocouple gauge
and open the high and low side
valves or the high vacuum
manifold set. With the valve on
the charging cylinder closed,
open the manifold valve to the
cylinder.
6. Evacuate the system to at least
29 inches gauge before opening
valve to thermocouple vacuum
gauge.
7. Continue to evacuate to a
minimum of 250 microns. Close
valve pump and watch rate of
rise. If vacuum does not rise
above 1500 microns in three
minutes, system can be
considered properly evacuated.
8. If thermocouple vacuum gauge
continues to rise and levels off at
about 5000 microns, moisture
and non-condensables are still
present. A leak is present if the
gauge continues to rise. Repair
and re-evacuate.
9. Close valve to the thermocouple
vacuum gauge and vacuum
pump. Shut off pump and
prepare to charge.
Charging the System
Charge the system with the exact
amount of refrigerant. Refer to the
unit nameplate for the correct
refrigerant charge. An inaccurately
charged system will cause future
problems.
Charging Procedure
1. When using an ambient-
compensated calibrated
charging cylinder, allow liquid
refrigerant only to enter the high
side.
2. After the system receives all the
refrigerant it requires, close
close the valve on the high side
of the manifold.
3. Start the system and charge the
balance of the refrigerant though
the low side. Do not charge in a
liquid form.
4. Close the low side valve on the
manifold and pinch-off both
process tubes. Remove the
manifold set. Crimp shut the
open ends of the process tubes
and braze.
5. Recheck for refrigerant leaks.
Refrigerant
Do not use a refrigerant other than
that shown on the unit nameplate.
Follow all precautionary measures
recommended by the refrigerant
manufacturers.
Line Piercing Valves
Line piercing valves may be used for
diagnosis but are not suitable for
evacuating or charging due to the
minute holes pierced in the tubing.
Line piercing valves must not be left
on the refrigerant system. The
connection between the valve and
the refrigerant tubing is not
hermetically sealed and will
eventually leak.
Open Lines
Never leave refrigerant lines open to
the atmosphere when processing the
refrigeration system. Water vapor
may enter the lines and cause
improper evacuation.
Operating Test
The final step in a successful repair is
an accurate operating test. Follow the
cooling and heating performance
tests on pages 36 - 37 to make sure
the product is performing to design
standards.
WARNING
Hazardous Voltage!
Disconnect all electric power,
including remote disconnects before
servicing. Follow proper lockout/
tagout procedures to ensure the
power can not be inadvertently
energized. Failure to disconnect
power before servicing could result
in death or serious injury.
WARNING
Live Electrical Components!
During installation, testing, servicing
and troubleshooting of this product,
it may be necessary to work with live
electrical components. Have a
qualified licensed electrician or other
individual who has been properly
trained in handling live electrical
components perform these tasks.
Failure to follow all electrical safety
precautions when exposed to live
electrical components could result in
death or serious injury.
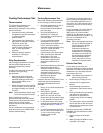
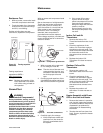
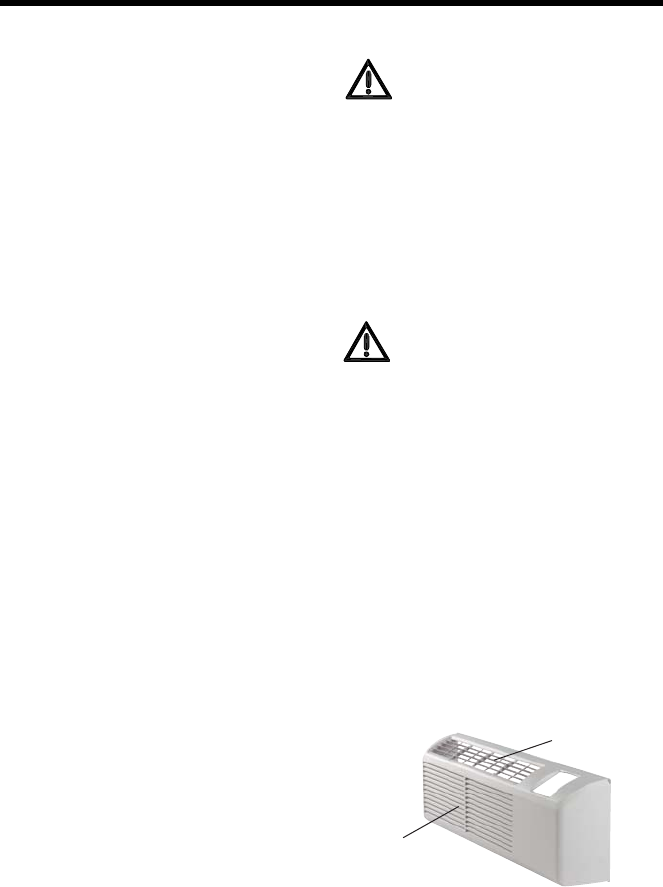
Figure 24. Proper placement of
discharge and inlet air thermostats
Place discharge and
inlet air thermostats
Place inlet thermostat
in center of grille