


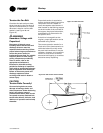

Routine Maintenance
CAH-SVX01A-EN 53
11 Allow the unit to dry thoroughly
before putting it back into
service.
12 Replace all panels and parts and
restore electrical power to the
unit.
13 Be careful any contaminated
material does not contact other
areas of the unit or building.
Properly dispose of all
contaminated materials and
cleaning solution.
Coil Winterization
Water coil winterization procedures
consist primarily of draining water
from the coil before the heating
season. Trane recommends flushing
the coil with glycol if coils will be
exposed to temperatures below 35
degrees.
Install field-fitted drains and vents to
permit winterization of coils not in
use and to assist in evacuating air
from the water system during
startup. If draining is questionable
because of dirt or scale deposits
inside the coil, fill the coil with glycol
before the heating season begins.
Note: On many unit sizes, there are
multiple coils in the coil module. Be
sure to winterize all coils in a given
coil module.
CAUTION
Use Approved Glycol!
Use a glycol approved for use with
commercial cooling and heating
systems and copper tube coils.
Failure to do so may result in
equipment damage.
CAUTION
Avoid Coil Freezeup!
Properly drain and vent the coils
when they are not in use. Trane
recommends glycol protection in all
possible freezing applications.
Failure to properly protect coils may
result in equipment damage.
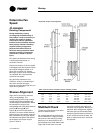
Type W, P2, P4, P8, WD, 5D,
and 5W Coils
1 Remove the vent and drain
plugs.
2 Blow the coil out as completely
as possible with compressed air.
3 Fill and drain the coil several
times with full strength glycol so
that it mixes thoroughly with the
water retained in the coil.
4 Drain the coil out as completely
as possible.
5 To ensure no water remains in
the coil, do not replace the vent
and drain plugs until the coils are
put back into service.
CAUTION
Twisted Tubes!
Use care in removing header plugs
from type P2, P4, and P8 coils.
Overtorquing may result in twisted
tubes.
Type K Coils
1 Remove all vent and drain plugs.
2 Allow the water to drain from the
coil.
3 Remove the header covers.
4 If tubes are fouled, clean the
tubes with a nylon or wire brush.
5 To ensure no water remains in
the coil, do not replace the
header covers until the coils are
put back into service.
Note: When the coils are put back
into service, use new gaskets. Trane
recommends washers be used
under the bolt heads and bolts be
evenly tightened to 50 ft.-lbs torque.
Moisture Purge
Cycle
By it’s very nature, any HVAC unit
with a cooling coil serves as a
dehumidifier, reducing the
surrounding air’s ability to hold
water vapor as its temperature falls.
This normally doesn’t present a
problem when the unit is running.
However, when the fan stops, water
vapor condenses on the cold metal
surfaces inside the air handler and
remains there until the air warms
sufficiently to re-evaporate it.
Providing a moisture purge cycle
15 to 30 minutes after shutdown
disperses the cold, humid air inside
the air-handling system more evenly
throughout the building. This four-
step cycle:
• Closes the outdoor air dampers.
• Turns off the cooling coil.
• Opens any variable-air-volume
terminals connected to the air
handler.
• Operates the supply fan for
10 to 15 minutes.
• Rotates inlet guide vanes full
open to full close.
Air movement discourages water
condensation and hastens re-
evaporation of any condensate that
does happen to form. This simple
preventative measure effectively
combats microbial growth and curbs
moisture-related deterioration of air-
handling components.