


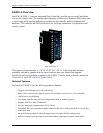
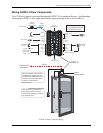
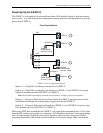


Chapter 2: S-EIDC-U (ethernet Integrated Door Controller)
18
Intelli-M Hardware Installation And Reference Guide
Setting A DHCP IP Address Within The S-EIDC-U
When using DHCP addressing, an S-EIDC-U on power up sends a request for an address lease to
any DHCP server on the network. If a DHCP server is present on the network, that server will
respond with an IP address, Subnet Mask, and Gateway (i.e., an alternate route) for the S-EIDC-
U. The S-EIDC-U will store this information.
There are two primary types of DHCP addressing, which are as follows:
• Dynamic DHCP addressing with an expiration time limit
• Permanently Leased DHCP addressing
The S-EIDC-U requires Permanently Leased DHCP addressing. The problem with Dynamic
DHCP addressing is that after a time the address assigned to an S-EIDC-U may expire, and the
network could assign the S-EIDC-U a different address. If Supervisor Plus software is used with
the S-EIDC-U, then Supervisor Plus may still be configured with the expired address. When this
happens, random failures can occur within the S-EIDC-U and Supervisor Plus software
application. If DHCP addressing is to be used at a location, check with the location’s network
administrator to ensure that only Permanently Leased DHCP addressing will be used with S-
EIDC-U(s).
Note: The Supervisor Plus software has not been UL verified.
Important: Do not use Dynamic DHCP addressing with an expiration time limit. Always check with
the network administrator to make sure that the network will be using Permanently Leased DHCP
addressing if DHCP addressing is to be used with an S-EIDC-U.
Setting An S-EIDC-U For DHCP Addressing
The S-EIDC-U is shipped from the factory set for DHCP addressing. If you are not sure an S-
EIDC-U is set for DHCP addressing, or need to set an S-EIDC-U for DHCP addressing, do the
following:
1. Perform the steps described in the “Determining The Network IP Address Type” section
above to get the S-EIDC-U’s current address.
2. Using a standard web browser, browse to the IP address obtained in Step 1.
3. Click the “Start” button to be presented with a login screen. The default user Name is
admin and the default Password is admin (all lower case).
Note: If the Name and/or Password have been changed in the device and are unknown, the S-EIDC-U will
need to be reset to its factory defaults to enable access. Refer to “Resetting an S-EIDC-U” later in this
Chapter to perform a hardware reset.
4. Click the “System” button and then click “Controllers.”
5. Select the S-EIDC-U controller (i.e., click to highlight the line) and then click the “Modify”
button.
6. Make sure that the “Use DHCP” box has a check mark in it. If unchecked, click the box to
add a check mark to it. This enables DHCP addressing for the S-EIDC-U.
7. Click “Ok” and then “Done” to set the change.