


Chapter 2: S-EIDC-U (ethernet Integrated Door Controller)
Intelli-M Hardware Installation And Reference Guide
17
This means a DHCP IP address cannot be determined (i.e., there is no DHCP connection).
When this occurs, the S-EIDC-U will revert to its built in default static address of
169.254.1.1
Note: The default static address can be changed when the S-EIDC-U is configured. Refer to the section
“Setting A Static IP Address Within The S-EIDC-U” below.
Setting A Static IP Address Within The S-EIDC-U
An S-EIDC-U can be statically addressed using a permanent IP Address, Subnet Mask, and
Gateway (i.e., default route). To do this, perform the following steps:
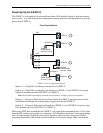
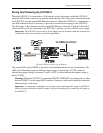
1. To determine the current IP address of the controller, use the LEDs on the S-EIDC-U unit
and note the IP address. If you look at the S-EIDC-U closely, each of the top five LEDs on
each side have a number (left side 1-5 and right side 6-0).
2. Disconnect the power from the S-EIDC-U and then reconnect the power. The IP address of
the device will be displayed three times on power up. IP address interpretation from LEDs
is as follows:
• All LEDs will flash three times to begin the sequence. (The S-EIDC-U is fully operational dur-
ing IP address flashing.)
• A numbered (LED) will flash representing each number in the IP address. Each number group
is separated by all LEDs flashing once.
For example: 145.198.1.1 interprets as #1 flash #4 flash #5 flash <all flash> #1 flash #9 flash
#8 flash <all flash> #1 flash <all flash> #1 flash <all flash>.
• Once the sequence has repeated 3 times, the S-EIDC-U LEDs will return to normal operation
mode. Note that the entire sequence can be repeated at any time by power cycling the S-EIDC-
U.
3. Obtain a valid static IP Address, Subnet Mask, and Gateway that is to be set into the S-
EIDC-U from the Network Administrator of the facility where the S-EIDC-U is located.
4. Using a standard web browser, browse to the IP address obtained in Steps 1 and 2 above.
Click the “Start” button to be presented with a login screen. The default user Name is
admin and the default Password is admin (all lower case).
Note: If the Name and/or Password have been changed in the device and are unknown, the S-EIDC-U will
need to be reset to its factory defaults to enable access. Refer to “Resetting an S-EIDC-U” later in this
Chapter to perform a hardware reset.
5. Click the “System” button and then click “Controllers.”
6. Select the S-EIDC-U controller (i.e., click to highlight the line) and then click the “Modify”
button.
7. Uncheck the “Use DHCP” box by clicking it. This enables the IP Address, Subnet Mask,
and Gateway fields so that they can be changed.
8. Type the new IP Address, Subnet Mask, and Gateway information into the appropriate
fields.
9. Click “Ok” and then “Done” to set the changes. The S-EIDC-U is now ready for further
configuration and use.