


14
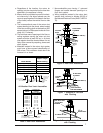
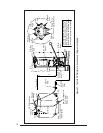
MTG. PLATE TABS
SLIDE FURNACE
ALL THE WAY BACK
ONTO MTG. PLATE
SU
P
PLY A
IR
D
U
C
T
Knockout O
ver H
oles
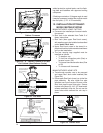
SECURE FURNACE
WITH 2 FASTENERS AT FRONT
CORNER HOLES
SUPPLY AIR DUCT
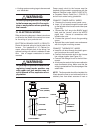
FUEL
LINE
HOLES
MTG. PLATE TABS
SLIDE FURNACE
ALL THE WAY BACK
ONTO MTG. PLATE
SECURE FURNACE
WITH 2 FASTENERS
AT FRONT CORNER HOLES
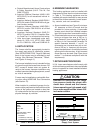
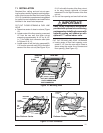
Figure 19. “A”, “B”, & Platinum
Cabinet Furnaces
Figure 20. “A” Cabinet Furnace on 911969
Coil Cabinet (Non-Platinum Series)
added protection against leaks, coat the flash-
ing plate and fasteners with approved roofing
compound.
If flashing mounted on 12 degree angle is used
it may be necessary to adjust the angle to match
the roof pitch; (1/12 - 4/12 maximum).
12. INSTALLATION OF TRANSIT-
MODE VENTING SYSTEM
MANUFACTURED HOME FACTORY
a. Furnace to be installed per furnace installa-
tion manual.
b. Roof Jack to be selected from Table 5 of
these instructions.
c. Roof Jack (less upper Roof Jack crown),
with weather cap to be installed as described
under Install Roof Jack.
d. Upper Roof Jack crown to be stored in a
prominent location inside manufactured home
until on-site installation.
e. The four warning tags supplied must be
installed as follows:
• To weather cap
• To fuel line connection point (Gas) or
furnace burner (Oil)
• To furnace flame observation door (Gas
or Oil)
• To furnace wall thermostat
MANUFACTURED HOME SITE
a. Transit-mode weather cap to be removed
and upper Roof Jack crown installed (See
Figure 24).
b. Place upper Roof Jack (crown) on to the flue
pipe assembly. Be sure inside flue pipe
attaches over inner flue pipe. Be sure outer
Roof Jack pipe fits over outer pipe. Secure
in place using three (3), #10, 1/2" sheet metal
screws removed in step #a. Do not use the
same holes which secured the rain cap in
place.
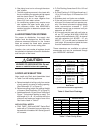
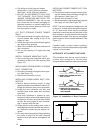
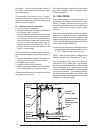
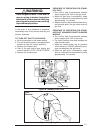
Secure Roof Jack with
appropriate fasteners
after connecting to
furnace
Ceiling
Caulk under roof
flashing to prevent
water leakage
Roof
Optional #901943
Ceiling Trim Ring
or #902521
2-piece Ceiling Ring
Figure 21. Flat Roof
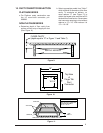
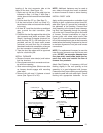
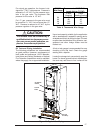
Ceiling
Caulk under roof
flashing to prevent
water leakage
Secure flashing
with appropriate
fasteners
Secure lower roof
jack section with
no. 10 S.M. screws
Roof
Upper Roof
Jack Section
Optional
Slant-Deck
Flashing
Figure 23. Pitched RoofFigure 22.