


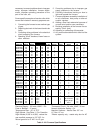
12
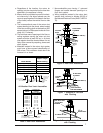
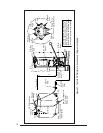
Figure 16. Installation of Duct Connector
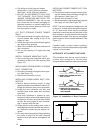
b. Cut ceiling and roof holes as follows:
Ceiling Hole = 8-3/4" (222 mm) diameter
Roof Hole = 9-3/8" (238 mm) diameter
c. DO NOT ALLOW DEBRIS TO FALL INTO
THE FURNACE. THIS COULD CAUSE
UNSAFE OPERATION AND VOIDS THE
FURNACE WARRANTY. Use the top cap
that comes with the furnace packaging (or
alternate protector) to prevent debris from
falling into the furnace before the final roof
jack connection is made.
CUT DUCT OPENING (FINGER TABBED
ONLY)
a. Place duct connector through the floor open-
ing with bottom tabs resting on top of the
supply air duct.
b. Center duct connector and push back against
rear edge of floor opening.
c. Mark cut-out location (tab area) and remove
duct connector.
d. Cut out duct opening 1/4" larger than area
marked.
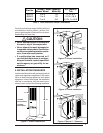
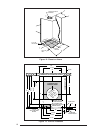
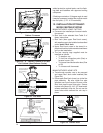
INSTALL FURNACE MOUNTING PLATE
a. Place mounting plate (supplied within duct
connector) at rear of the floor opening (See
Figure 15).
INSTALLING PLATINUM SERIES 14” ROUND
DUCT CONNECTOR
a. Place duct connector through the floor open-
ing. (See Figure 15).
b. Secure duct connector to floor.
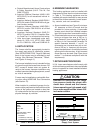
INSTALLING SCREW DOWN DUCT CON-
NECTOR
a. Apply a bead of caulking, mastic, or other
approved sealant around bottom side of 1/2”
flange and restrictor plate, when applicable.
b. Locate the duct connector over duct and
carefully lower screw down duct connector
into place.
c. Once duct connector is located on duct,
temporarily hold in place while fastening duct
connector to the floor using flat head screws
or nails. Be sure flanges of duct connector
stay in contact with the duct.
d. Screw plenum to duct making sure a seal is
made between the duct and the duct connec-
tor. Additional screws may be added if re-
quired.
e. Cut away duct along edge of flange allowing
the center to drop into the duct. Remove
section of duct with caution, as edges will be
sharp.
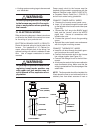
INSTALLING FINGER TABBED DUCT CON-
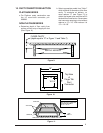
NECTORS
a. Place duct connector through the floor open-
ing with bottom tabs extending through the
duct opening. (See Figure 15)
b. Secure duct connector to floor.
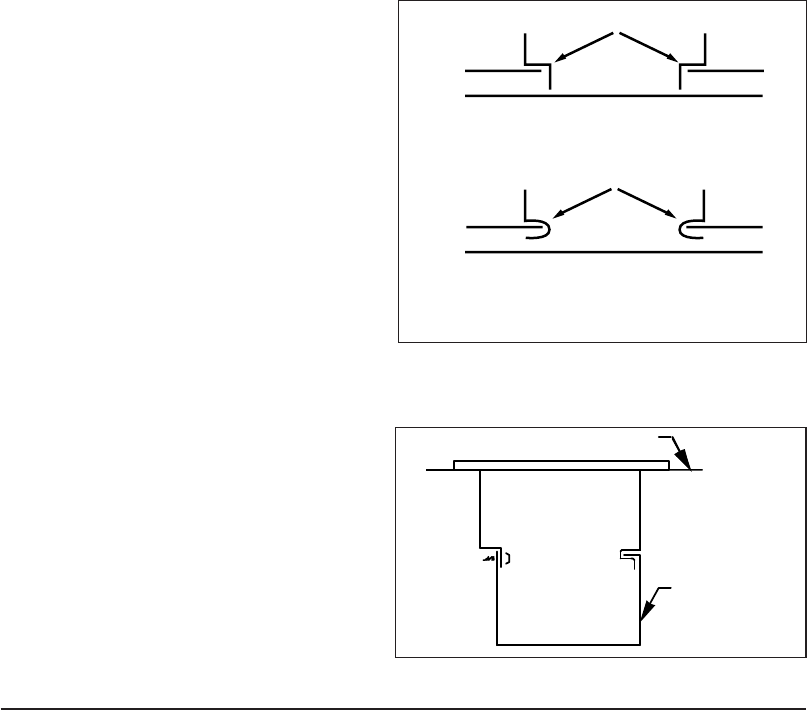
c. Bend bottom tabs under and up tightly against
the supply air duct (See Figure 16).
NOTE: The duct connector is designed for use
on ducts 12" in width. When using the connector
on 12" wide ducts, there may be insufficient
clearance to bend the tabs on two sides of the
duct connector. In such cases the tabs may be
attached to the sides of the duct by using sheet
metal screws or other suitable fasteners. (See
Figure 17).
If sealant, mastic, or tape is used to provide a
better seal, it should be approved by applicable
national or local codes.
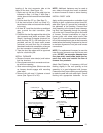
ALTERNATE ATTACHMENT METHODS
This procedure may also be used to install a
furnace duct connector to narrow metal
ductwork where insufficient clearance prevents
Duct
Duct Connector
Narrow Duct
Figure 17.
TABS
TABS
DUCT
DUCT
1. INSERT DUCT CONNECTOR INTO
DUCT CUT-OUT.
2. BEND BOTTOM TABS OVER
AND ONTO THE UNDERNEATH
DUCT SERVICE.