


41
Using the Main Menu
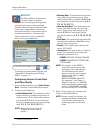
2 Configure the following:
• Vloss Response Time: Sel
ect the time (in
seconds) that the buzzer and on-screen
message will turn on after a Video loss
event.
• Response Dura
tion: Select the time (in
seconds) for the DVR to record after a
motion event. This also controls the
duration of the buzzer and on-screen
message.
NOTE: When the buzzer is
activated,
press any button or right-click
to stop it. This does not disable
the buzzer for future events.
• Alarm F
ull Screen: Se
lect O if you want
the DVR to display events (for example,
when motion is detected or video loss
occurs) in full screen; select X to have the
DVR remain in its current view when events
occur.
3 Right-click t
o s
ave your settings and
return to the Alarm Menu.
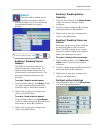
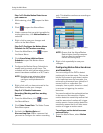
Configuring the Motion Alarm
Schedule
The Motion Alarm Schedule allows you
to enable or disable motion events at
certain times. This can be useful if you
want to set up your DVR to record
continuously during business hours and
record motion events only outside of
business hours.
To configure the Motion Schedule:
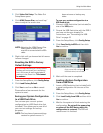
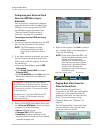
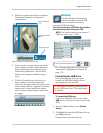
1 F
rom the Alarm Menu, click Alarm Setup.
The Alarm
Setup Menu opens.
2 Click Moti
on Alarm Schedule. The Motion
Alarm Schedule opens.
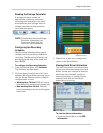
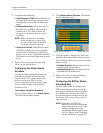
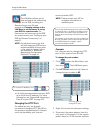
Motion Alarm Schedule
Range Selectors
3 Click the boxes to switch each half-hour
between Working and Non-working hours.
Use the Range Selectors to switch multiple
boxes at once.
• Enabled (yellow): Motion
events will be
enabled during these hours.
• Disabled (green): Motion e
vents will be
disabled during these hours.
4 Right-click until
you have existed all
menus to save your changes.
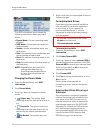
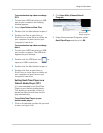
Configuring the DVR for Motion
Recording Only
Use the steps below to configure the
DVR to disable continuous recording
and only record footage that has motion.
This allows you to record for a much
longer time before the hard drive is full.
You can do this on one, some, or all of
your cameras.
NOTE: By default, the DVR will
o
verwrite the oldest recordings
when the hard drive is full. It can
also be configured to stop
recording when the hard drive is
full. For details, see “Changing
the Record Mode” on page 37.