


111
Appendix D: Recording and Playing Audio
Appendix D: Recording and Playing Audio
The DVR is capable of recording one audio channel, which can be assigned to any available
camera channel. Audio recording requires an audio-capable camera (not included) or
self-powered microphone (not included).
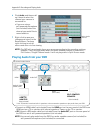
The DVR can play audio from self-powered speaker
s (not included) or
from an HDMI TV or
monitor (not included) with internal speakers.
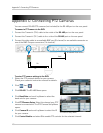
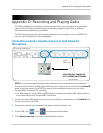
Connecting an Audio-Capable Camera or Self-Powered
Microphone
AUDIO CAPABLE CAMERA OR
SELF-POWERED MICROPHONE
Video
(BNC cable)
Audio (RCA cable)
Audio IN
Video IN (CH 1~8)
(Not included)
8-channel model shown
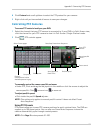
NOTE: It is recommended to test the audio and video on your cameras prior to installation.
1 (Camera only) Connect the BNC video cable from your camera to one of the available Vide
o IN
ports on the rear panel of the DVR (8-channel) or an available connector on one of the
Octopus BNC connectors (16-channel).
• For RCA cameras, use an RCA-to-BNC adapter to connect the yellow RCA video connector
to
the Video IN ports or Octopus BNC connectors.
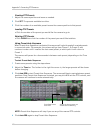
2 Connect the white RCA audio connector from the camera or microphone to the Audio I
N port
on the rear panel of the DVR.
3 Connect the camera or microphone to a power outlet and power it on.
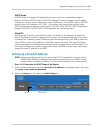
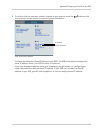
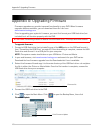
4 On the DVR, click
. Click to access the Record Menu.
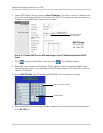
5 Click Video F
rame Rate. The Video Frame Rate Menu opens.