


Sewing Machine Model
M_quina de Coser Modelo 8 O 8 0
Machine & Coudre Mod61o
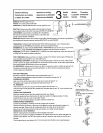
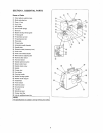
SETTING UPYOUR MACHINE
1. You'll find thespool pin on the top cover. Pull up the spool pin.
2. Plug footcontrolintomachine receptacle.Then connectpowersupplyplugintoany 110/120
voltA.C. walloutlet.
3. Your sewing machine has been thoroughly oiled at the factory. Besure to wipe needle plate
and shuttle areas free of oil before sewing agarment. Practice on a scrap of fabric to absorb
any surplus oil.
INSTALACION DE LAMAQUINA
1. El portacarretes se encuentra en la cubierta superior. Jale el perta carretes hacia arriba.
2. Enchufeel pedal en el conector de la m_quina. Luego conecte el cordbn con cualquier
tomacorriente de CA 110-120 volt.
3. La m_,quinade coser se ha lubricado completamente en la f_,brica.No deje de limpiar
cuidadosamente el _,reade la placa de aguja, placa de asiento y lanzadera antes de coser
unaprenda. Serfa aconsejable practicar en un trozo de tela de manera que se absorbiera
alg0n excedente de aceite.
INSTALLATION DE LA MACHINE
1. Voustrouverezla broche pour la bobine de fil sur]ecapet sup_rieur. Relevez labroche.
2. Branchezla prise de lap_dale dansle r_ceptacle surlamachine. Puisbranchez le cordon
d'alimentationdarts une prise_lectrique murale 110-120 voltAC. "
3. Votremachine _tcoudrea 6t_ enti_rementhuil_e enusine.Assurez-vous quevous
essuyezsoigneusement la r_gionautour de laplaqued'aiguille,leplateau et lanavette
avantde coudreunvetement.Faites unessaisur unechutede tissupour absorbertout
exc_sd'huile.
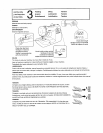
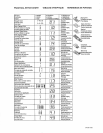
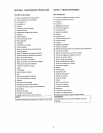
MODE SELECTION KEY
Press this button to enter one of thefollowing modes.
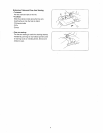
[] Patternselection mode:
Pressthe Up_ orDown_ key untilthe patternnumberof thedesiredstitch appears onthe
LED display.
[] Stitch width adjusting mode:
Pressthe Up (_ key toincrease the stitch widthor Down_ key todecrease.
[] Stitch length adjusting mode:
Pressthe Up _ key toincreasethestitch lengthor Down_ key todecrease.
Direct pattern selection
The following four patternscan be directlyselectedbypressing the correspondingkey.
#01 Straight stitch#06 Sensor buttonhole#10 Zigzag stitch #12 Sergingstitch
TECLA DE SELECCION DE MODALIDAD
Oprima este bot6n para acceder a unade las siguientes modalidades.
[] Modalidad de selecci6n de patr6n:
Optima latecla M_s_,o Menos_hasta que aparezcaen la pantalla eln0merode patr6nde la
puntadaquaquiere.
[] Modalidad de ajuste de anchura de puntada:
Oprima latecla M&s_ para aumentarla anchurade puntadao latecla Menos_7 para reducirla.
[] Modalldad de ajuste de Iongitud de puntada:
Oprima latecla M&s _ paraaumentarla Iongitudde puntadao la teclaMenos_para reducirla.
Selecci6n directa depatr6n
Loscuatropatronesindicadosa continuaci6npueden seleccionarse en forma directaoprimiendola
tecla correspondiente.
#01 Puntadarecta#06 Ojal consensor #10 Puntadaen zigzag#12 Puntadade sobrehilado
TOUCHE DE SI:i:LECTIONDU MODE
Appuyer sur ce boutonpourutiliserun des modessuivants.
[] Mode de s_lection du point
Appuyer sur latouche_ou sur la touche_ jusqu'_,ce que lehombre correspondantau pointque vous
d6sirez apparaisse sur t'affichage _lectronique.
[] Mode de r_glage de la largeur du point:
Appuyer sur la touche_ pouraugmenterla largeurdu pointousurlatouche_ pouren diminuer lalargeur.
[] Mode de r_glagede la Iongueur du point:
Appuyer sur latouche_ pouraugmenterla Iongueurdupointousur latouche_pour diminuer la Iongueur.
S_lection directe du point
• Lesquatrepointssuivantspourront etre s_lectionn_s directementenappuyantsur lestouches
correspondantes.
N.01 PointdroitN.06 D_tecteur boutonniereN.10 PointzigzagN.12 Pointde surfilage
Spoolpin
Portacarretes
Brochesabobines
Power switch Machine plug
Encendido/ Clavija de la m&quina
Apagado Fiche de p_dale
Interr_
p,ug/
Cordon_lectrique
Mode Selection Key
Tecla de Selecci6n de
modalidad
Touche de s6iection du
mode
Direct Stitch Pattern
Selecci6ndirectadepatrbn
S_lectiondirectedupoint