


classic HE - Installation & Servicing
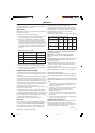
17
INSTALLATION
REAR FLUE OUTLET
14
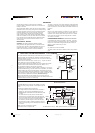
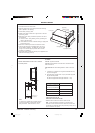
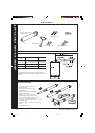
CUTTING THE FLUE - wall thicknesses of 75 to 705mm
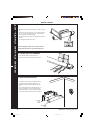
1. Measure and note the wall thickness X (Refer to Frame 10).
2. Mark the wall thickness onto the flue.
3. To ensure the tube is cut square, mark the flue all the way
around.
4. Position the inner flue spring to support the inner flue during the
cutting process.
5. Cut to length X, (refer to Frame 10).
6. Remove any burrs and remove the inner flue support ring.
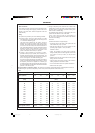
15
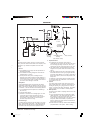
FITTING THE FLUE CONNECTING RING AND THE BOILER SEALING RING TO THE FLUE
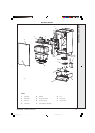
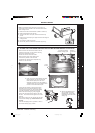
1. Remove the two fan electrical connections, the red
pressure sensing pipe, the blue CO/CO2 sensing
pipe and the two fan fixing screws.
2. Pull the fan forward, remove and retain.
3. Remove the two fixing screws retaining the
removable top section of the aluminium
recuperator and carefully lift the recuperator top
section from the main body.
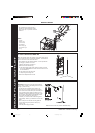
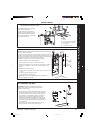
5. If using the flue finishing kit, push the black outer
wall seal over the outer flue duct (Refer to Frame
16) prior to fitting the flue ring. Fit the boiler sealing
ring inside the terminal 'B' pack outer flue duct.
Ensure the boiler sealing ring is fully engaged.
Ensure the notch aligns with the label on the outer
flue duct. This ensures correct alignment of the flue
terminal.
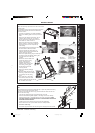
6. Drill 3 holes 3.2mm (1/8") dia. through the outer flue
duct and boiler sealing ring. Do NOT drill the inner
flue duct.
7. Insert the self-tapping screws, provided, in order to
fix the boiler sealing ring in position.
8. Stick the self-adhesive foam
strip, provided in the boiler
hardware pack, onto the flue
immediately behind the boiler
sealing ring.
cla7841
Note. If the downward piping kit bracket is to be used, it is
essential that 30mm is added to the measured wall thickness
when marking the flue.
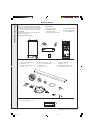
4. Fit the 'O' ring to the flue extension ring and fit
the flue extension ring (to be found in the
boiler hardware pack) to the rear of the
recuperator top section using the three M4 x
10 taptite screws and form C washers also to
be found in the boiler hardware pack.
4
3
cla7662
5
Fixing
screws
Electrical
connections
Air pressure switch &
CO/CO2 sensing pipes
1
201850-6.pmd 21/02/2008, 12:5817