


20
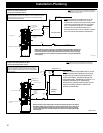
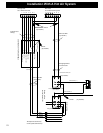
Electrical interconnection of the BH60 to an existing heat pump, or fuel-red hot air furnace:
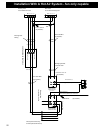
Interconnection with a heat pump will generally require a second thermostat to be installed. It is recommended
that a new electronic thermostat be installed as close to the existing thermostat as possible. Installing within one
foot of the existing thermostat is recommended for ease of interconnection and similar temperature sensing ability.
If programmability is desired, both thermostats should have this capability. If only the new thermostat is
programmable, you’ll need to keep the existing thermostat set several degrees below the lowest programmed
temperature setting of the new thermostat. NOTE: In this conguration, if the BH60 cannot maintain the desired
thermostat setting, the room will be allowed to cool to the lower set point of the existing thermostat before allowing
the heat pump to operate.
Special note: Even if the heat pump has a multi-stage thermostat, it cannot be re-wired to make the rst stage control
the BH60, and the second stage control the heat pump. All multi-stage heat pump thermostats are interconnected
so that the compressor unit and/or the changeover solenoid activate with the rst stage only.
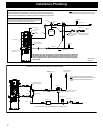
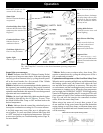
Controlling the existing furnace fan during overheat situation.
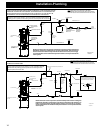
Following the wiring diagram on the next page, you will need to supply and install a piece of 18/3 Thermostat
wire between the low-voltage control terminal strip on the upper left-hand side of the BH60’s control cover, to the
low-voltage control of the existing furnace.
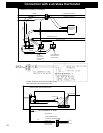
Note: Some systems may have external terminals and some may have them enclosed within the unit. If the
connections to the exisitng system need to be made internally, be sure to use the proper protective grommet
or connector where passing through the cabinet of the existing unit.
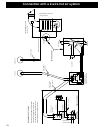
If the wiring used does not match the colorings listed, follow the corresponding numbers on the terminal strips
to ensure proper connection.
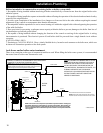
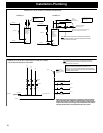
Step 1. Disconnect electrical power to the existing heating system.
Step 2. Install the above mentioned thermostat wire between the two systems
Step 3. Connect the three (3) wires to the BH60 control terminal strip as indicated.
Step 4. Remove the green wire which comes from the exisiting thermostat and connects to the terminal marked
“G” on the existing system and splice it to the green (or #1) wire from the BH60.
Step 5. Connect the white wire (or #5) from the BH60 to the “G” terminal of the existing system. This white wire
should be the only wire connected to “G”.
Step 6. Now, the red (#3) wire from the BH60 should be added to the “R” terminal of the existing system. Do not
remove or replace any existing wires from “R”, just add this one to them.
Restore power to the existing system only. Using the existing thermostat, increase the setting to verify that the
system works as it did prior to the interconnection. Increase and decrease the thermostat a few times to verify
proper reaction. In the case of a heat pump system, be sure the outdoor compressor unit is also cycling. Notice:
Most compressors have a built in lockout timer (usually 5 minutes) so you may need to wait between thermostat
adjustments to verify proper operation.
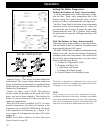
Once you are certain that nothing changed with the operation of the existing system, turn the existing system’s
thermostat down far enough that it won’t come on during the test. Connect power to the BH60, and turn on the
circuit breaker on the front of the unit. With the control in the “OFF” position, turn the feed adjuster knob to “Test”.
When the OVERHEAT SAFETY ZONE light illuminates, the fan on the existing system should come on. Be sure
that the fan is the only thing on. There should be no power to the compressor or the oil or gas burner.