


Heat & Glo • ST-36TR-IPI, PIER-36TR-IPI • 2176-900 Rev. F • 8/1114
B. Maintenance Tasks-Qualifi ed Service
Technician
The following tasks must be performed by a qualifi ed ser-
vice technician.
Gasket Seal and Glass Assembly Inspection
Frequency: Annually
By: Qualifi ed Service Technician
Tools needed: Protective gloves, drop cloth and a stable
work surface.
• Inspect gasket seal and its condition.
• Inspect fi xed glass assembly for scratches and nicks that
can lead to breakage when exposed to heat.
• Confi rm there is no damage to glass or glass frame.
Replace as necessary.
• Verify that fi xed glass assembly is properly retained and
attachment components are intact and not damaged.
Replace as necessary.
Logs
Frequency: Annually
By: Qualifi ed Service Technician
Tools needed: Protective gloves.
• Inspect for damaged or missing logs. Replace as necessary.
Refer to Section 14 for log placement instructions.
• Verify correct log placement and no fl ame impingement
causing sooting. Correct as necessary.
Firebox
Frequency: Annually
By: Qualifi ed Service Technician
Tools needed: Protective gloves, sandpaper, steel wool,
cloths, mineral spirits, primer and touch-up paint.
• Inspect for paint condition, warped surfaces, corrosion
or perforation. Sand and repaint as necessary.
• Replace fi replace if fi rebox has been perforated.
Control Compartment and Firebox Top
Frequency: Annually
By: Qualifi ed Service Technician
Tools needed: Protective gloves, vacuum cleaner, dust
cloths
• Vacuum and wipe out dust, cobwebs, debris or pet hair.
Use caution when cleaning these areas. Screw tips that
have penetrated the sheet metal are sharp and should
be avoided.
• Remove all foreign objects.
• Verify unobstructed air circulation.
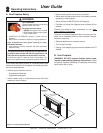
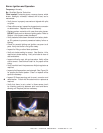
Ember Light Replacement
Frequency: As Required
By: Homeowner or Qualifi ed Service Technician
Tools needed: Protective gloves, 5/16 in. nut driver
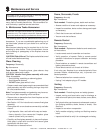
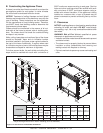
In the lower gas valve compartment you will fi nd three ac-
cess panels for the three light bulbs. See Figure 3.1
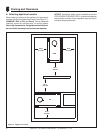
Figure 3.1 Access Panel
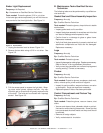
Figure 3.2 Remove Bolts
1. Unplug the electrical cord as shown Figure 13.1.
2. Remove the two bolts using a 5/16 in. nut driver. See
Figure 3.2.
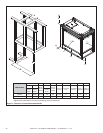
3. Pull the access panel to expose the light bulb. Wear-
ing clean cotton gloves, replace the bulb. Any skin
oils which get on a new bulb will greatly reduce the life
of the bulb. The bulb can be cleaned with isopropyl
alcohol. See Figure 3.3.
Figure 3.3 Replace Bulb