


– 33 –
∗
∗∗
∗29 COMMUNICATION DEVICE MENU MODE (Pass-Through Programming)
This mode is for programming an IP, GSM, or IP/GSM Communicator Module using an alpha keypad. Alternatively, these
options can be programmed via the AlarmNet Direct website. After programming is complete, the module must be registered
with AlarmNet before reporting via the communication device can occur. Refer to the device’s instructions for registration
procedures.
NOTE: The module must be set to device address 3.
IMPORTANT: The use of an IP/GSM Communicator Module
requires an AlarmNet–I account. Please obtain the account
information from the central station prior to programming this
module.
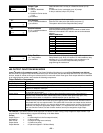
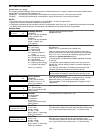
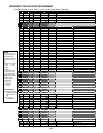
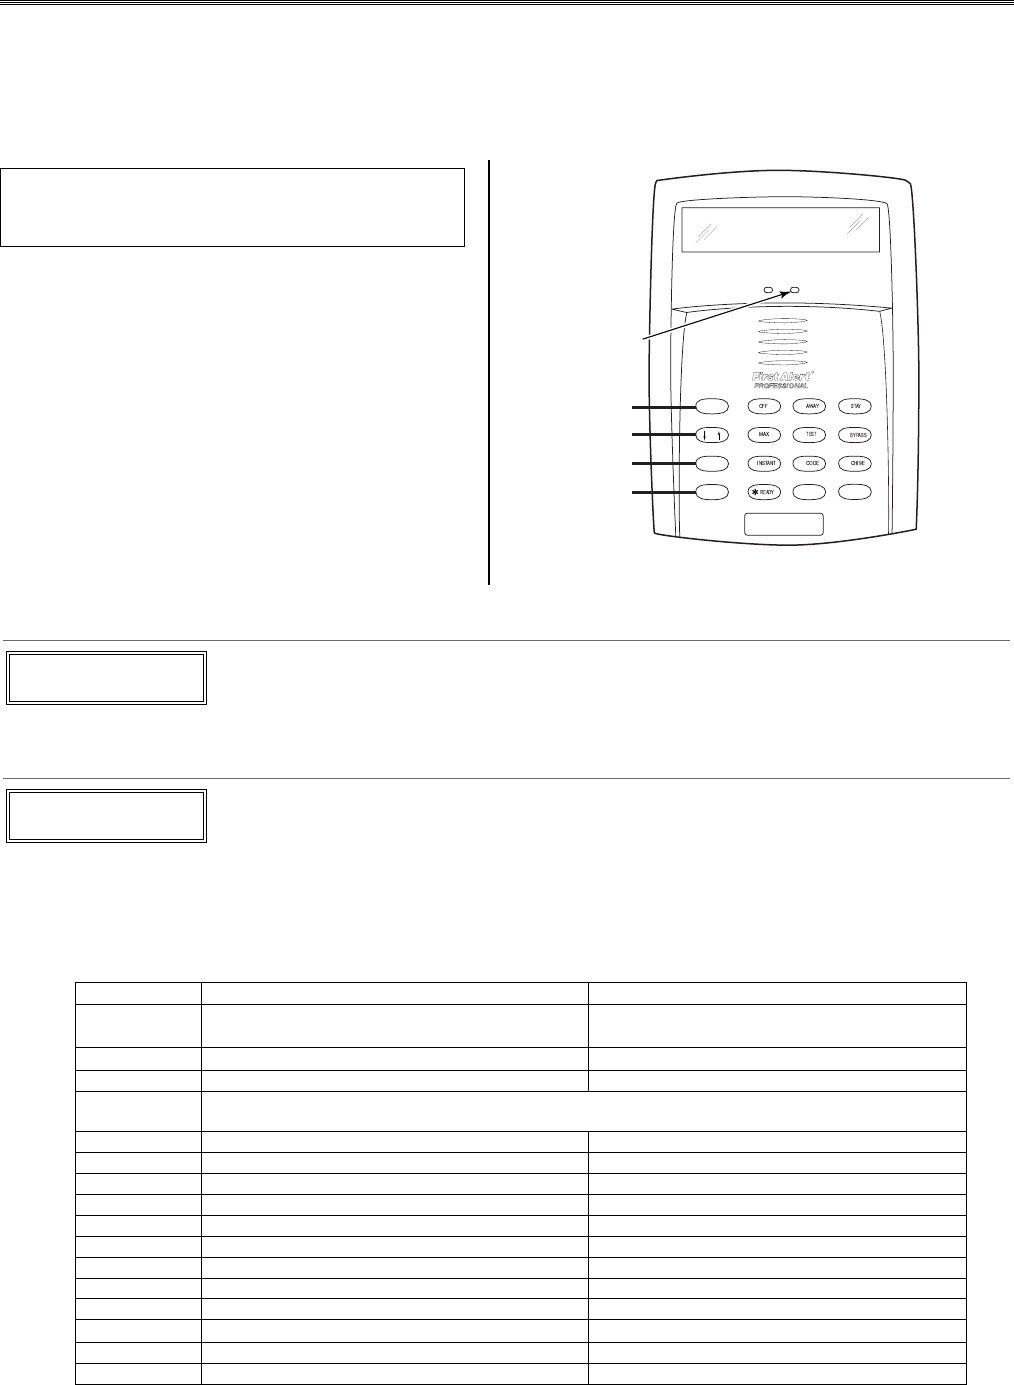
Using an Alpha Keypad as a 7720P Programming Tool
When programming with ∗29 menu mode, the alpha
keypad mimics the functions of the 7720P Programming
Tool. See figure to right and table below for 7720P key
functions. Each key has two possible functions: a normal
function and a SHIFT function.
Normal functions: The numeric values labeled directly
on the keys and the left-hand functions shown in
diagram on the ABC keys. To perform a normal key
function, simply press the desired key.
SHIFT functions: Those functions shown in diagram
above the numerical keys and the right-hand functions
shown on the ABC keys. To perform a SHIFT key
function, press SHIFT key (D key), then press the
desired function key (shift function is indicated by the lit
READY LED).
(B)
SPACE
SHIFT
N / Y
BS/ESC
ENTER
S
T
X
D
E
F
A
B
C
FA560KP-005-V0
SHIFT
FUNCTION
WHEN LIT
/
(C)
(D)
(A)
ARMED
READY
FA560
6
4
7
9
#
3
5
8
0
2
1
R
7720P Emulation Template for Alpha Keypads
∗
∗∗
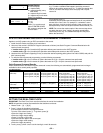
∗29 IP/GSM Program Mode
Press ∗29 while in Data Field Programming mode. The following prompts appear.
ENABLE IP/GSM?
0=No, 1=Yes
Enable IP/GSM?
0 = no, not using IP or GSM;
1 = yes using IP and/or
GSM module
[∗] to continue
[Default = 0 (no IP and/or GSM)]
If using a communication device, enter 1 at this prompt and
enter 1-Prog at the next prompt to program and register the
device. Use the communication device’s Installation Guide for
details of the device’s programming prompts and instructions for
registration.
1=PROG 2=DIAG
0=QUIT
Programming /
Diagnostics Select
1= Prog (program the
IP/GSM options)
2 = Diag (enter diagnostic
mode)
0 = Quit; returns to data field
programming mode
Select whether you want to program the communication device
or enter the device’s diagnostic mode.
Diagnostic Mode Note: Diagnostic mode option available only
for communicators with firmware version 2.4.16 or higher.
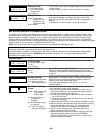
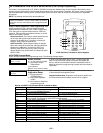
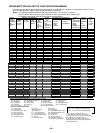
Normal and SHIFT key Functions While in ∗
∗∗
∗29 Menu Mode
Key Normal Key Function SHIFT Key Function
(A) = BS/ESC [BS]: Press to delete entry [ESC]: Press to quit Program Mode
Also, can reset EEPROM defaults
†
(B) = ↓/↑ [↓]: Scroll down programming [↑]: Scroll up programming
(C) = N/Y [N]: Press for "NO" answer [Y]: Press SHIFT-Y for "YES" answer
(D) = SHIFT Press before pressing a SHIFT key function. Will light READY LED. LED goes out once a
key is pressed. Press again for each SHIFT function desired.
1/A [1]: For entering the number 1 [A]: Used for entering C.S. ID number
2/B [2]: For entering the number 2 [B]: Used for entering C.S. ID number
3/C [3]: For entering the number 3 [C]: Used for entering C.S. ID number
4/D [4]: For entering the number 4 [D]: Used for entering C.S. ID number
5/E [5]: For entering the number 5 [E]: Used for entering C.S. ID number
6/F [6]: For entering the number 6 [F]: Used for entering C.S. ID number
7/S [7]: For entering the number 7 [S]: Press to display diagnostic status
8/T [8]: For entering the number 8 [T]: Press to send TEST messages
9/X [9]: For entering the number 9 [X]: Press to reset the IP/GSM
[∗] / SPACE [∗]: Used to select programming options
[SPACE]: Not used
0 [0]: For entering the number 0
[#] / ENTER [#] / ENTER: Press to accept entries No SHIFT function
† Active only when the "REVIEW?" prompt is displayed