


WARNING: IF YOU DO NOT FOLLOW THESE INSTRUCTIONS EXACTLY A FIRE OR EXPLOSION
MAY RESULT, CAUSING PROPERTY DAMAGE, PERSONAL INJURY OF LOSS OF LIFE.
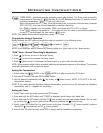
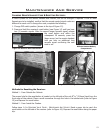
LIGHTING AND TURNING OFF INSTRUCTIONS:
Figure 3: Lighting instruction label.
1.
ARRÊTEZ! Lireles instructions desécurité mentionnéesplus haut.
2.
Ajustez lethermostat à sonplus basniveau.
3.
Coupez toutealimentation électrique del'appareil.
4.
Fermez lavalve principale (enposition "OFF")en appuyant surle bouton
"ON/OFF" dela télécommande àdistance ousur le tableaude contrôle,ou
en tournantle bouton dansle sensdes aiguilles d'unemontre.
5.
Attendez cinq(5) minutes pourévacuer toutle gaz. Sivous sentezencore
du gaz,ARRËTEZ et suivezles instructionsmentionnées au pointA). Si
vous nesentez pas degaz, procédezà l'étape suivante.
6.
a) Allumezl'appareil automatiquement enpressant etgardant enfoncés,
simultanément, lesboutons étoile et flèchevers le hautde la
télécommande àdistance ou enappuyant sur lebouton "ON/OFF "
du tableaude contrôle jusqu'àce qu'unsignal sonore sefasse entendre
confirmant ledébut de laséquence dedémarrage et relâchezles boutons.
Un signalsonore continu confirmeque laséquence de démarrageest en
cours. OU
b. Allumezl'appareil manuellement enmettant lavalve principale enposition "ON",
pour cefaire, tourner lebouton dansle sens contrairedes aiguillesd'une montre
. Appuyezsur le boutonveilleuse etallumez la veilleuse.La hauteurde la
flamme peutêtre ajustée entournant lebouton "HI/LO".
NOTE: Lorsquel'allumage de laveilleuse estconfirmé, le gazcircule. Aprèsplusieurs
essais, sila veilleuse nereste pasallumée, appuyer surle bouton"OFF" de la
télécommande àdistance ou dutableau decontrôle, ou fermerla valveprincipale
(en position"OFF") et appelervotre techniciende service qualifiéou votre
fournisseur degaz.
7.
Rétablissez l'alimentationélectrique de l'appareil.
8.
Ajuster lethermostat aux ajustementsdésirés, utilisezla télécommande àdistance
ou letableau de contrôlepour ajuterla flamme. Appuyersur laflèche vers lehaut
pour augmenterla hauteur dela flammeou appuyer surla flèchevers le baspour
la diminuerou pour mettrel'appareil enmode veilleuse. Poureffectuer des
ajustements deflamme plus subtiles,taper légèrementdes flèches parpetits coups.
1. STOP! Read the safety informationabove on this label.
2. Set thermostat to its lowest setting.
3. Turn off all electrical power to thisappliance.
4. Turn main valve OFF bypushing the on/off button on the remote handset
or on the control panel or alternatively, byturning the knob clockwise .
5. Wait five (5) minutes to clear outany gas. If you smell gas STOP! Follow “B”
in the above safety information. If youdo not smell gas go to the next step.
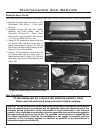
6. Ignite the unit by:
a. Simultaneously press and hold the star and up arrow buttons on the
remote handset or just the ON/OFF button on the control panel untila short
acoustic signal confirms the start sequence hasbegun; release button(s).
Continuing signal confirms the ignition sequence isin process.
OR
CAUTION:
Hot while operating. Do not touch, severe burns may result. Keep children, clothing,
furniture, gasoline or other flammable vapors away.
FOR YOUR SAFETY READ BEFORE OPERATING
WARNING: IFYOU DO NOT FOLLOW THESE INSTRUCTIONSEXACTLY, AFIRE OR EXPLOSION MAY RESULT CAUSING
PROPERTY DAMAGE, PERSONALINJURY ORLOSS OF LIFE.
A) This appliance has apilot which must be lighted by hand. When lightingthe pilot,
following these instructions exactly.
B) BEFORE LIGHTING smell all around theappliance area for gas. Be sure to smell
next to the floor because some gasis heavier than air and will settle on the floor.
WHAT TO DO IF YOU SMELLGAS: Do not try tolight any appliance. Do not touch
any electrical switch: do not use anyphone in your building. Immediately call your
gas supplier from a neighbor's phone. Follow the gas suppliers instructions.If
you cannot reach your gas supplier, call the fire department.
C) Use only your hand to push inor turn the gas control knob;
NEVER use tools. If the knob willnot push in or turn by hand,
do not try to repair it. Calla qualified service technician.
Force or attempted repair may result ina fire or explosion.
D) Do not use this appliance if anypart has been under water.
Immediately call a qualified service technician toinspect the
appliance and to replace any part ofthe control system and
any gas control which has been underwater.
LIGHTING INSTRUCTIONS
b. If igniting the unit manually, turn the mainvalve ON by turning
the knob counter clockwise . Push in the solenoid and
light the pilot. Flame height can beadjusted manually by turning
the hi/low knob.
NOTE: Once pilot ignition is confirmed themain gas will flow. If the
pilot will not stay lit after severaltries, press OFF button on the
remote handset or control panel, or turnthe main gas valve
knob) to OFF and call your servicetechnician or gas supplier.
7. Turn on the electrical powerto the appliance.
8. Set thermostat to desired setting oruse the remote handset or
control panel to adjust flame. Press uparrow to increase flame
height, press down arrow to decrease flameheight or set
appliance to pilot flame. For fine adjustmenttap the up/down
arrows.
TO TURN OFF GAS TO APPLIANCE
1. Set the thermostat to lowest settingor press
OFF button on remote or control panel.
C-11102
NOTE: Turn off all electrical power to thisappliance if service is to be performed. Follow
appliance manufacturer’s instructions for gaining accessibility to the gascontrol.
CAUTION: Do not operate this fireplace with the glass removed, cracked or broken. Replacement of the panel should be done by a licensed or
qualified person! This appliance needs fresh air for safe operation and must be installed so there are provisions for adequate combustion and
ventilation air. Keep burner and control compartment clean. See installation and operating instructions accompanying appliance.
WARNING: Improper installation, adjustment, alteration, service or maintenance can cause injury or property damage, or loss of life. Refer to
owner's information manual provided with this appliance. For assistance or additional information consult a qualified installer, service agency or
the gas supplier. Installation and service must be performed by a qualified installer, service agency, or the gas supplier.
1.
Régler lethermostat au plusbas niveauou appuyer surle bouton"OFF"
de latélécommande à distanceou dutableau de contrôle.
.
ATTENTION:
C-11102
ATTENTION: Nefaites pas fonctionnercet appareilsi la fenêtrede verreest enlevée, craquéeou brisée.Le remplacement dela fenêtredoit être effectuépar un
technicien qualifiéou licencié. Cetappareil nécessiteun apport d'airfrais pourun fonctionnement sécuritaire.Il doitêtre installé entenant comptede ses besoinsd'air pour
une combustionet une ventilationadéquate. Gardezle brûleur etle compartimentde contrôle propres.Consultez lesinstructions d'installation etd'opération fourniesavec
cet appareil.
AVERTISSEMENT: Unemauvaise installation, unmauvais ajustement,une altération, unservice ouune maintenance nonprofessionnel, peuventcauser des blessures,
des dommagesà la propriétéou mêmela mort. Consultezle manueldu propriétaire fourniavec cetappareil. Pour uneassistance oupour toute informationadditionnelle,
consulter uninstallateur qualifié, uneagence deservice ou unfournisseur degaz. L'installation etle servicedoivent être effectuéspar uninstallateur qualifié, uneagence
de serviceou un fournisseurde gaz.
POUR VOTRE SÉCURITÉ, LISEZ CES INSTRUCTIONS AVANT L'UTILISATION
AVERTISSEMENT: SI CES INSTRUCTIONS NE SONT PASSUIVIES EXACTEMENT, IL POURRAIT SE PRODUIRE UN FEU OUUNE
EXPLOSION POUVANT CAUSER DES BLESSURES, DES DOMMAGESÀ LA PROPRIÉTÉ OU MÊME LA MORT.
A)
Cet appareilpossède une veilleusedevant êtreallumée manuellement. Suivezles
instructions ci-dessouspour allumer laveilleuse.
B)
Avant d'allumerle poêle, assurezvous qu'iln'y ait pasd'odeur degaz dans l'air.
Vérifiez qu'iln'y ait pasd'odeur degaz à différentsniveaux, carcertains gaz sontplus
lourds quel'air et ilspourraient sesituer au niveaudu sol.
QUE FAIRESI VOUS SENTEZDU GAZ?Ne tentez pasd'allumer l'appareil.Ne
touchez pasaux interrupteurs électriqueset n'utilisezpas les appareilstéléphoniques
de votrerésidence. Contactez immédiatementvotre fournisseurde gaz àpartir d'un
téléphone duvoisinage et suivezleurs instructions.Si vous nepouvez rejoindrevotre
fournisseur degaz, appelez leservice desincendies de votrequartier.
C)
Utilisez vosmains pour appuyersur l'interrupteurde gaz ousur lebouton
de contrôledu gaz, n'utilisezjamais desoutils. SI lebouton nes'enfonce
pas oune se tournepas àmains nues, n'essayezpas dele réparer vous-
même, appelezun technicien deservice qualifié.Forcer ou tenter
d'effectuer uneréparation pourrait résulteren unfeu ou uneexplosion.
D)
N'utilisez pascet appareil s'ila étéou des piècesde celui-ciont été
immergées sousl'eau. Contactez immédiatementun techniciende service
qualifié pourqu'il effectue uneinspection del'appareil et/ou pourqu'il
remplace toutepièce du systèmede contrôleou toute piècedu systèmede
contrôle dugaz qui auraientété submergéessous l'eau.
INSTRUCTIONS D'ALLUMAGE:
FERMEZ L'ALIMENTATIONDE GAZ ÀL'APPAREIL
:
NOTE: Coupeztoute alimentation électriquede l'appareilsi le servicedoit êtreexécuté.
Suivez leinstructions du manufacturierpour l'accèsau contrôle degaz.
Cet appareil est chaud lorsqu'il est enmarche. Ne pas toucher au risque de provoquer degraves brûlures. Tenez les
enfants, les vêtements, les meubles, l'essence outoutes autres vapeurs inflammables éloignés de l'appareil.
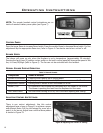
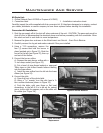
Operating Instructions
For Your Safety, Read Safety Precautions And Lighting Instructions Before Operating
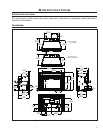
Figure 4: Control panel.
ON
OFF
Low / Off / High
Fan Rocker Switch
Smaller
Flame
Larger
Flame
On/Off
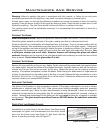
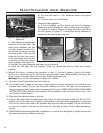
Figure 5: Ignition assembly.
Pilot/
Orifice
Ignitor
Thermocouple
The Sonnet can be controlled either with the control panel on the bottom left
corner of the unit or with the handset remote control.
7