


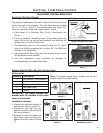

Initial Installation
QUALIFIED INSTALLERS ONLY
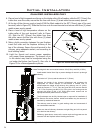
The height for the vent must be between 10ft (3.05m) and 35ft (10.67m).
Install sealed Vertical Vent Cap to prevent leakage of room air up through
chimney.
The intake is 2" (51mm) and the exhaust is 3" (76mm).
Measure the height of the chimney beforehand and purchase the
appropriate kit. Never attempt to over-stretch a flexible liner to
accommodate the height of the chimney. Any chimney over 15' (4.6m),
install the Sonnet 15’ 2” & 3” Flex Vent (part #50-1512) and the Sonnet
2” & 3” Flex Couplers (part #50-1513). Every joint in the venting must be
secured with three (3) #8 x 3/8” HWH sheet metal screws and an
appropriate sealant (either silicone or milpac).
The flue damper can be fully blocked open or removed for installation of
the Sonnet; the smoke shelves, shields and baffles may be removed if
attached by mechanical fasteners.
The chimney must be clean, in good working order and constructed of
non-combustible materials.
Make sure that all chimney cleanouts are tight fitting and will not permit
air to leak into the chimney.
Refractory, glass doors, screen rails, screen mesh and log grates can be
removed from the fireplace before installing the Sonnet.
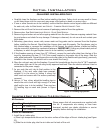
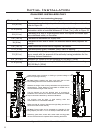
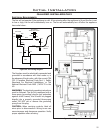
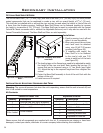
Figure 43: Installation of Sonnet DV .
24
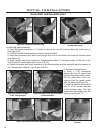
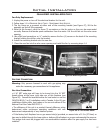
8. Place a bead of high temperature silicone on the
intake collar of the vent terminal (refer to Figure
42). Slide the Ø2” (51mm) ex intake liner over
the collar, secure the ex liner with three (3) sheet
metal screws evenly spaced.
9. Make a tight connection between the gas replace
insert ue collar and the replace chimney at the
top of the chimney. Secure the vent terminal to the
chimney using adequate sealant, and according to
local building codes.
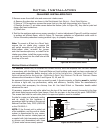
10. Light the Sonnet and ensure proper operation
and proper ame appearance. The amount of air
to the venturi may need to be adjusted using the
rod under the rebox (see Figure 8). Also refer to
Figure 79 for a ame appearance picture.
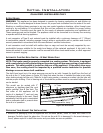
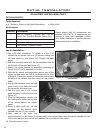
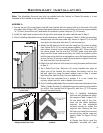
2" (51mm) Air Inlet
3" (76mm) Exhaust
Figure 42: Vertical Vent Cap Underside.
6. Place a bead of high temperature silicone on the intake collar of the replace, slide the Ø2” (51mm) ex
intake liner over the collar, secure the ex liner with three (3) sheet metal screws evenly spaced.
7. At the top of the chimney, apply a bead of Mill-Pac Black sealant to the Ø3” (76mm) pipe of the vent
terminal (refer to Figure 42). Slide the ex liner onto the vent terminal and secure with three (3) sheet
metal screws evenly spaced.