


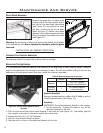
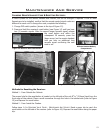
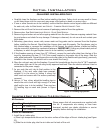
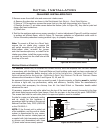

Figure 22: Burner Removal.
Figure 21: Unfastening Burner.
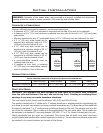
Maintenance And Service
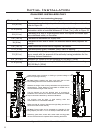
Kit Parts List:
1 - Orice (Natural Gas #42 DMS or Propane #54 DMS)
1 - Conversion label 1 - Installation instruction sheet
Carefully inspect the orice supplied with this conversion kit. If it has been damaged or is missing, contact
your dealer, distributor or courier company to have them replaced before starting this installation.
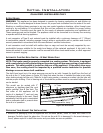
Conversion Kit Installation:
1. Shut the gas supply off at the shut-off valve upstream of the unit. CAUTION: The gas supply must be
shut off prior to disconnecting the electrical power and before proceeding with the conversion. Allow
the valve and unit to cool down to room temperature.
2. Remove the glass door as shown in the M
AINTENANCE AND SERVICE - GLASS DOOR REMOVAL.
3. Carefully remove the log set and ember material if they are installed.
4. Using a T-20 screwdriver, remove the
four (4) screws that hold the burner in
place (pointed out in Figure 21). Slide the
burner to the left (see Figure 22), then up
and out of the rebox.
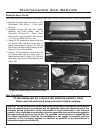
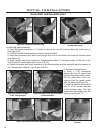
5. Convert the burner orice:
a) Remove the main burner orice with a
inch deep socket (see Figure 23).
Figure 23: Orice Removal. Figure 24: Orice
Replacement.
b) Put a bead of pipe-thread sealant or approved
Teon tape on the orice threads before installing
into the brass elbow.
c) Install the new orice from the kit into the brass
elbow (see Figure 24).
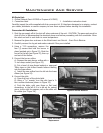
6. Convert the pilot:
a) Open the front of the pilot shield.
b) Using a
7
/16” wrench, turn the pilot head a
turn counter-clockwise (shown in Figure 25).
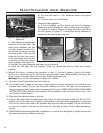
c) Push the slider, with your nger or at head
screwdriver, to the left if it is to be set for natural
gas or to the right for propane, red on the slider will
be visible (see Figure 26).
15
Figure 25: Turn Pilot Head.