


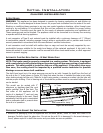
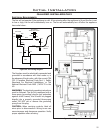
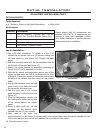

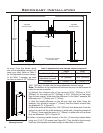

Figure 47: Installing Fan onto Back Panel.
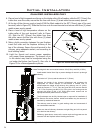
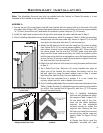
Figure 46: Removing/Installing Back Panel
From Sonnet.
OPTIONAL FAN KIT:
Tools Required:
● ” Socket or Driver or Flat Head Screwdriver ● Utility Knife
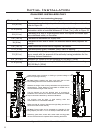
Kit Contents:
Quantity Description
1 Fan Kit Assembly (includes Back Cabinet
Panel, Fan, Mounting Bracket, Power Cord,
1 Wiring Harness
1 Temperature Sensor
1 Fan Control; 3 Position Switch
Fan Kit Installation:
1. Use a at head screwdriver, ” socket, or a Torx T-20
screwdriver to remove the nine (9) screws holding the
old back panel on (see Figure 46). Discard old back
panel.
2. Hold the new back panel with the fan assembly close to
the left side of the unit (see Figure 47).
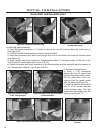
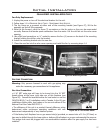
3. Ensure the wiring harness is assembled according to
Figure 45 & 47 and is attached to the fan.
4. Slide the fan switch and temperature sensor part of the
wiring harness under the left of the rebox to the front
of the unit. There are a couple of metal tabs on the lower
left side of the cabinet that the wiring can be hooked
under.
Initial Installation
QUALIFIED INSTALLERS ONLY
26
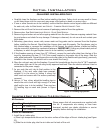
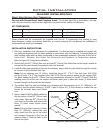
Please ensure that all components are
supplied with this kit. If components are
missing or have been damaged, contact
your dealer, distributor or courier company
before starting this installation
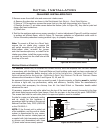
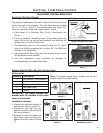
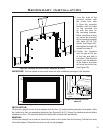
connectors are in on the three (3) position switch and remove them. Slide the switch through the front
of the hole that was just cut out and reattach the connectors to the switch.
10. Close the control panel.
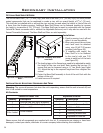
5. Line up the new back panel with the
screw holes in the back and install
the screws for the back cover.
6. Pull the right end of the control
panel forward; it will pivot out (see
Figure 12).
7. Slide the temperature sensor into
the holding tabs below the left end
of the burner behind the control
panel.
8. Using a utility knife cut out the
rectangle on the control panel
between the two (2) fan symbols.
9. Make note of the order the