


14
12
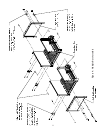
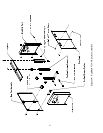
C. Section Assembly
1) Clean the boiler sections inside and out to remove dirt due to shipping and handling.
2) Clean all nipples and nipple ports with kerosene immediately prior to section assembly.
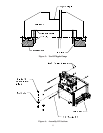
3) Set the left end section on the base so that the locating lugs on the bottom of the section go inside the front and
rear base panels. Left end sections are identified by “LEH” cast on the section. Right end sections are identified
by “REH” cast on the section.
4) Apply the Loctite 592 lubricant/sealant furnished to two nipples and the nipple ports in the left section.
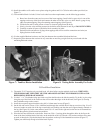
5) Start each nipple by hand in the nipple port and bump carefully with a wooden block to set. As this is done, check
the nipple frequently with the nipple gauge to verify that the nipple is square in the port and not cocked (see
Figure 5). Continue to bump the nipple until the nipple gauge just touches the ground surface as measured in two
directions 90 degrees apart.
6) Apply the “joint sealer” to all ground surfaces on the left end section.
7) Carefully join the first intermediate section with the left end section. Bump lightly to secure.
8) Install 5/8" nuts and washers on one end of each of three 9 ¾” tie rods. Install one of these tie rods in each of the
three bosses in the left and intermediate section. Lubricate the other end of each of these tie rods with heavy oil or
grease. Install 5/8" nuts and washers on the lubricated ends. Finger tighten.
9) Draw the two sections together slowly and evenly, tightening each tie rod a little at a time so that the sections are
evenly spaced. KEEP THE NIPPLES ALIGNED WITH THE NIPPLE PORTS – DO NOT DRAW UP THE
SECTIONS IF THE NIPPLES ARE COCKED. Continue drawing up the sections in this manner until the
ground surfaces on each section are touching.
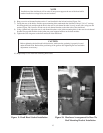
10) Repeat Steps (4-9) to assemble the remaining sections. After approximately five sections have been drawn
together, use a pinch bar to insert the wood wedges supplied under the last intermediate section to raise it above
the base. This will make it easier to assemble subsequent sections, particularly the right end section. As each
section is drawn up, move the wedges under that section.
11) After all sections have been drawn up, verify that the bottom lugs on the left end section are still against the left
end base panel. Using a pinch bar, remove the wood wedges and carefully lower the right end of the assembled
block onto the base.
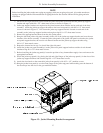
12) Install four block anchors using 3/8 x 2" cap screws, nuts and washers (Figure 6).
13) Loosen all tie rod nuts so that they are finger tight.
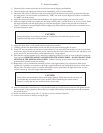
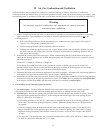
CAUTION
Seating the nipples in accordance with the above instructions will make drawing the sections
together easier and assure water tight joints.
CAUTION
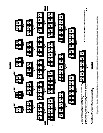
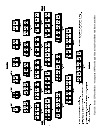
Some boilers use intermediate sections with supply tappings. When these sections are used, it is
critical that they are located in the correct position. When assembling the sections refer to
Figure 2 to verify that they are assembled in the correct order.