


61
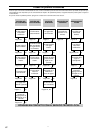
CONTENTS
KNOWING YOUR
SEWING MACHINE
STRAIGHT AND
ZIGZAG STITCHING
BUILT-IN STITCHES
BUTTONHOLE AND
BUTTON SEWING
USING ATTACHMENTS
AND APPLICATIONS
MAINTENANCE
INDEX
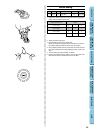
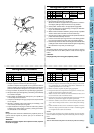
Monogramming
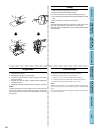
1. Sew moving the hoop slowly along the lettering at a constant speed.
2. Secure with a few straight stitches at the end of the last letter.
Embroidering
1. Stitch the outline of the design by moving the embroidery hoop.
2. Fill in the design by alternating from the outline of the design to the
inside and from the inside to the outline until the design is com-
pletely filled in. Keep the stitching close together.
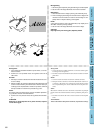
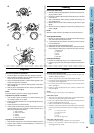
NOTE:
A long stitch is made by moving the embroidery hoop rapidly and a
short stitch is made by moving it slowly.
3. Secure with a few straight stitches at the end of the design.
CAUTION:
Keep fingers away from moving parts, especially needles.
Monogramas
1. Cosa moviendo el bastidor lentamente por las letras, a una velo-
cidad constante.
2. Termine con unas puntadas rectas de seguridad al final de la
última letra.
Bordado
1. Remarque el contorno del diseño moviendo el bastidor de acuer-
do con el dibujo.
2. Rellene el dibujo de puntadas adelantando alternativamente del
contorno hacia el interior y del interior hacia el exterior hasta que
el dibujo quede completamente cubierto de puntadas, teniendo
siempre cuidado en mantener las puntadas muy juntas.
NOTA:
Se pueden realizar puntadas largas al mover el bastidor rápidamen-
te y puntadas cortas al moverlo lentamente.
3. Termine con unas puntadas rectas de seguridad al final del dibu-
jo.
ATENCIÓN:
Mantenga los dedos alejados de las piezas móviles, especial-
mente de las agujas.
Monogrammi
1. Cucire muovendo il cerchietto lentamente e a velocità costante seguen-
do il disegno del monogramma.
2. Terminata l’esecuzione dell’ultima lettera, fissare la cucitura con alcuni
punti diritti.
Ricami
1. Cucire il contorno del motivo muovendo il cerchietto da ricamo.
2. Riempire il motivo cucendo con movimento alternato dal contorno ver-
so l’interno e dall’interno verso il bordo del contorno finché il motivo
non è completamente pieno. Cucire mantenendo le linee di punti ravvi-
cinate.
NOTA:
Muovendo il cerchietto da ricamo velocemente si otterranno dei punti più
lunghi, mentre muovendolo lentamente verranno prodotti dei punti più cor-
ti.
3. Terminata l’esecuzione del motivo, fissare la cucitura con alcuni punti
diritti.
ATTENZIONE:
Tenere le dita lontano dalle parti in movimento, in particolare dall’ago.