


58
CONTENTS
KNOWING YOUR
SEWING MACHINE
STRAIGHT AND
ZIGZAG STITCHING
BUILT-IN STITCHES
BUTTONHOLE AND
BUTTON SEWING
USING ATTACHMENTS
AND APPLICATIONS
MAINTENANCE
INDEX
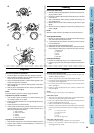
A
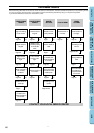
B
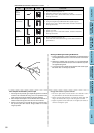
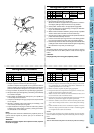
Darning
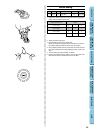
XL5030 XL5020 XL5010
Pattern Stitch Length
1 1 5 Straight Stitch Any
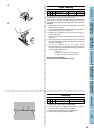
1. Place the darning plate on the needle plate as shown in fig. A.
1’. Lower the feed dogs by setting the drop feed lever to the up posi-
tion. (When the machine is equipped with a Drop Feed.)
2. Set the pattern selection dial to the Straight Stitch.
3. Place the portion to be darned under the presser foot together with
a fabric underlay for reinforcement.
4. Remove the presser foot and presser foot holder, then lower the
presser foot lifter.
5. Begin sewing alternating between gently drawing the work away
from you and pulling it toward you.
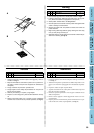
6. Repeat this motion until the portion to be darned is filled with par-
allel lines of stitching. (See fig. B.)
Zurcido
XL5030 XL5020 XL5010
Número de puntada
Largo de puntada
1 1 5 Puntada recta Cualquiera
1. Coloque la placa de zurcido en la placa de la aguja tal y como se
muestra en la fig. A.
1’. Baje los alimentadores colocando la palanca en la posición ha-
cia arriba. (cuando la máquina está equipada con alimentación
de bajada).
2. Ponga el selector de puntada en puntada recta.
3. Ponga el tejido a zurcir debajo del prensatelas con una pieza de
tela de refuerzo debajo.
4. Retire el prensatelas y su soporte y luego bájelo.
5. Empiece a coser empujando y tirando alternativamente del teji-
do.
6. Repita la operación hasta que el zurcido se haya completado
creando unas cuantas líneas de puntadas paralelas. (Ver fig. B.)
Rammendo
XL5030 XL5020 XL5010
Punto Lunghezza
1 1 5 Punto diritto Quella prescelta
1. Posizionare la placca da rammendo sulla placca dell’ago come illustra-
to nella fig. A.
1’. Abbassare il trasportatore spostando la leva abbassa-trasportatore verso
il basso. (se la macchina è equipaggiata con la leva abbassa-trasportato-
re)
2. Disporre il selettore dei punti sul punto diritto.
3. Applicare una tela di rinforzo sotto la parte da rammendare e disporre il
tutto sotto il piedino premistoffa.
4. Rimuovere il piedino premistoffa e il suo supporto e abbassare la leva
abbassa-trasportatore.
5. Iniziare a cucire spingendo e tirando leggermente il lavoro con movi-
mento alternato.
6. Ripetere questo movimento finché la parte da rammendare non è coper-
ta da una fitta serie di linee di punti paralleli. (Vedi fig. B.)