


42
CONTENTS
KNOWING YOUR
SEWING MACHINE
STRAIGHT AND
ZIGZAG STITCHING
BUILT-IN STITCHES
BUTTONHOLE AND
BUTTON SEWING
USING ATTACHMENTS
AND APPLICATIONS
MAINTENANCE
INDEX
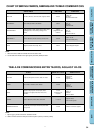
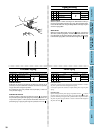
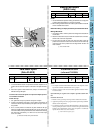
Elastic Stitching
XL5030 XL5020 XL5010
Pattern Stitch Length Stitch Width
9 9 9 Elastic Stitch
-2.5 Fixed 5
The Elastic Stitch can be used in three different ways: to mend, to sew
elastic, or to join fabric. Each method is explained below.
Set the pattern selection dial to the Elastic Stitch.
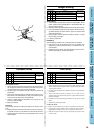
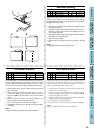
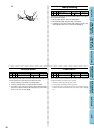
Mending
1. Set the stitch length dial between “ ” and “2.5”.
2. Place the reinforcement fabric under the tear to be mended.
3. Following the line of the tear, sew using the Elastic Stitch as illus-
trated in fig. A.
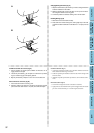
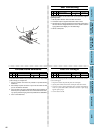
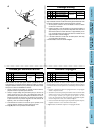
Sewing Elastic
1. Place the elastic on the fabric.
2. As you sew, stretch the elastic both in the front and behind the
presser foot as shown in fig. B.
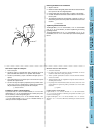
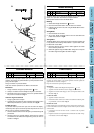
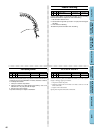
Joining Fabric
The Elastic Stitch can be used to join two pieces of fabric together and
is very effective when sewing knitted fabrics. If nylon thread is used,
the stitch will not be visible.
1. Place the edges of the two pieces of fabric together and center
them under the presser foot.
2. Sew them together using the Elastic Stitch taking care to keep the
two fabric edges close together as shown in fig. C.
A
B
C
Puntada elástica
XL5030 XL5020 XL5010
Número de puntada
Largo de puntada
Ancho de puntada
9 9 9 Puntada elástica -2,5 Fija 5
Se puede usar la puntada elástica para tres operaciones: los re-
miendos, la inserción de gomas elásticas y como puntada de unión
para juntar dos tejidos.
Ponga el selector en puntada elástica
Cada una de estas operaciones se detalla a continuación.
Remiendos
1. Ponga el selector de largo de puntada entre “ ” y “2,5”.
2. Coloque una tela de refuerzo debajo de la parte a remendar.
3. Siguiendo la línea de la rasgadura, cosa con la puntada elástica
tal y como se muestra en la fig. A.
Inserción de gomas elásticas
1. Ponga la goma sobre el tejido.
2. A medida que esté cosiendo, estire el elástico tanto delante como
detrás del prensatelas tal y como se muestra en la fig. B.
Puntada de unión
La puntada elástica puede servir para unir dos trozos de tejido y
resulta muy eficaz para la costura de prendas de punto. Si se usa un
hilo de nylon, la puntada resultará invisible.
1. Junte las orillas de ambos trozos de tejido y céntrelas debajo del
prensatelas.
2. Cósalas juntas con la puntada elástica, teniendo sumo cuidado
en mantener las dos orillas de los tejidos muy juntas, tal como se
muestra en la fig. C.
Punto elastico
XL5030 XL5020 XL5010
Punto Lunghezza Ampiezza
9 9 9 Punto elastico
-2,5 Fissa 5
Il punto elastico può essere utilizzato in tre applicazioni diverse: per ram-
mendare, per cucire elastici o per eseguire giunture di tessuti. Queste tre
applicazioni sono descritte di seguito.
Disporre il selettore dei punti sul punto elastico.
Rammendo
1. Disporre il selettore della lunghezza del punto tra “ ” e “2,5”.
2. Applicare il tessuto di rinforzo sotto lo strappo da rammendare.
3. Seguendo il contorno dello strappo, cucire con il punto elastico come
illustrato in fig. A.
Cucitura di elastici
1. Applicare l’elastico sul tessuto.
2. Durante la cucitura, tenere teso l’elastico sia davanti che dietro il piedi-
no premistoffa, come mostrato in fig. B.
Giunture di tessuti
Il punto elastico può essere utilizzato per cucire insieme due pezzi di tessu-
to ed è molto efficace su tessuti a maglia. Usando il filo di nylon, la cucitura
sarà invisibile.
1. Congiungere il bordi dei due tessuti e centrarli sotto il piedino
premistoffa.
2. Eseguire la cucitura con il punto elastico tenendo ben accostati i margi-
ni del tessuto come mostrato in fig. C.