


51
CONTENTS
KNOWING YOUR
SEWING MACHINE
STRAIGHT AND
ZIGZAG STITCHING
BUILT-IN STITCHES
BUTTONHOLE AND
BUTTON SEWING
USING ATTACHMENTS
AND APPLICATIONS
MAINTENANCE
INDEX
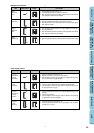
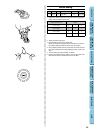
A
A/C
A
C
B
A/C
A
C
D
B
C
D
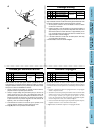
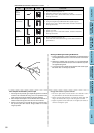
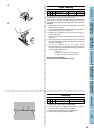
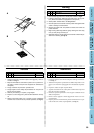
Securing the Stitching and Cutting the Buttonhole
1. To secure the stitching, turn the material 90° counterclockwise and
sew straight stitches to the end of the front bar tack of the button-
hole.
2. Remove the material from the machine. It is recommended that
pins be placed across both bar tacks of the buttonhole as protec-
tion against cutting them.
3. Cut an opening in the middle of the buttonhole with a seam ripper.
Be careful not to cut through any stitches.
Para Completar las Puntadas y Cortar el Ojal
1. Para asegurar las puntadas, gire el tejido 90 grados en el sentido
contrario a las manecillas del reloj y cosa unas puntadas rectas
hasta el final de la línea del remate de la parte delantera.
2. Retire el tejido de la máquina. Se recomienda colocar alfileres en
ambos remates del ojal para evitar el corte de los mismos.
3. Efectúe una apertura en el medio del ojal con el cortador espe-
cial que sirve para abrir costuras. Tenga cuidado en no cortar
ninguna puntada.
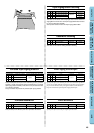
PROCEDIMENTO DI ESECUZIONE DI UN’ASOLA
Fase Lato cucito Punto Come cucire
1. Disporre il selettore dei punti su “A”.
2. Abbassare il piedino per asole ed eseguire 5 o 6 punti.
3. Quando l’ago si trova a sinistra della cucitura, arrestare la macchina e
alzare l’ago dal tessuto.
1. Disporre il selettore dei punti su “B”.
2. Cucire per la lunghezza prestabilita della linea segnata col gesso.
3. Quando l’ago si trova a sinistra della cucitura, arrestare la macchina e
alzare l’ago dal tessuto.
1. Disporre il selettore dei punti su “C” (stessa posizione della fase A).
2. Eseguire 5 o 6 punti.
3. Quando l’ago si trova a destra della cucitura, arrestare la macchina e
alzare l’ago dal tessuto.
1. Disporre il selettore dei punti su “D”.
2. Cucire il lato destro dell’asola finché l’ago non incontra la cucitura ese-
guita nella fase 1.
Fase 2
(lato sinistro)
Fase 3
(barretta
posteriore)
Fase 4
(lato destro)
Fase 1
(barretta
frontale)
Fissaggio della cucitura e apertura dell’asola
1. Per fissare i punti, ruotare il tessuto di 90° in senso antiorario e cucire
dei punti diritti fino alla fine della barretta frontale dell’asola.
2. Estrarre il tessuto dalla macchina. Si consiglia di infilare degli spilli
lungo le due barrette dell’asola per evitare di tagliare la cucitura.
3. Tagliare l’apertura al centro dell’asola con un taglia-asole facendo at-
tenzione a non tagliare i punti.