


36
CONTENTS
KNOWING YOUR
SEWING MACHINE
STRAIGHT AND
ZIGZAG STITCHING
BUILT-IN STITCHES
BUTTONHOLE AND
BUTTON SEWING
USING ATTACHMENTS
AND APPLICATIONS
MAINTENANCE
INDEX
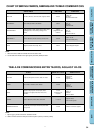
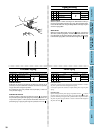
Straight Stitching
XL5030 XL5020 XL5010
Pattern Stitch Length
2 2 5 Straight Stitch (Center needle position)
1-4
3 3 6 Straight Stitch (Left needle position)
12 10 13 Triple Stretch Stitch (Center needle position)
Fixed 2.5
13 11 14 Triple Stretch Stitch (Left needle position)
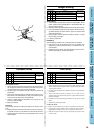
Starting Sewing
1. Turn the pattern selection dial to select the desired stitch. Set the
pattern selection dial to Straight Stitch or Triple Stretch Stitch for
the type of stitch required.
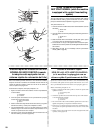
2. Raise the needle to its highest position and lift the presser foot lever.
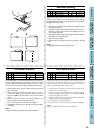
3. Pull up the lower thread by turning the balance wheel toward you
(counterclockwise) and place both the upper and lower threads
behind the presser foot.
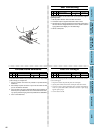
4. Place the fabric under the presser foot with the needle 1 cm (3/8")
from the edge of the fabric.
5. Lower the presser foot.
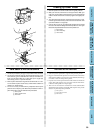
Backtacking
Reverse stitching is used to lock or reinforce the end of the stitch.
6. Press down on the reverse sewing lever as far as possible, then
lightly step on the foot controller. Sew 5 to 10 stitches in the re-
verse direction.
7. Release the reverse sewing lever and step down on the foot con-
troller to start sewing in the forward direction.
Puntadas rectas
XL5030 XL5020 XL5010
Número de puntada
Largo de puntada
2 2 5 Puntada recta (Aguja en el centro)
1-4
3 3 6 Puntada recta (Aguja a la izquierda)
12 10 13
Puntada triple elástica (Aguja en el centro)
Fija 2,5
13 11 14
Puntada triple elástica (Aguja a la izquierda)
Para empezar a coser
1. Gire el selector de puntadas para seleccionar la puntada desea-
da. Ponga dicho selector de puntadas en puntada recta o punta-
da triple elástica para el tipo de puntada deseado.
2. Levante la aguja a su posición más alta y levante la palanca del
prensatelas.
3. Saque el hilo inferior girando la ruedecilla hacia usted (en el sen-
tido contrario a las manecillas de un reloj) y tire los hilos superior
e inferior hacia la parte trasera del prensatelas.
4. Coloque el tejido debajo del prensatelas con la aguja de 1 cm
(3/8") de la orilla del tejido.
5. Baje el prensatelas.
Retroceso
La puntada de retroceso se utiliza para finalizar una costura o refor-
zarla.
6. Baje la palanca de retroceso hasta el final y presione suavemen-
te el pedal. Cosa de 5 a 10 puntadas en la dirección de retroceso.
7. Suelte la palanca de retroceso y pise el pedal para volver a coser
hacia adelante.
Punto diritto
XL5030 XL5020 XL5010
Punto Lunghezza
2 2 5 Punto diritto (ago al centro)
1-4
3 3 6 Punto diritto (ago a sinistra)
12 10 13 Punto stretch triplo (ago al centro)
Fissa 2,5
13 11 14 Punto stretch triplo (ago a sinistra)
Inizio della cucitura
1. Ruotare il selettore dei punti per selezionare il punto desiderato. Spo-
stare il selettore dei punti sul punto diritto o punto stretch triplo in base
al tipo di punto richiesto.
2. Far salire l’ago fino alla posizione più alta e sollevare la leva del piedino
premistoffa.
3. Tirare il filo inferiore girando il volantino verso se stessi (in senso
antiorario) e disporre insieme il filo superiore e quello inferiore dietro il
piedino premistoffa.
4. Stendere il tessuto sotto il piedino premistoffa con l’ago a circa 1 cm dal
bordo.
5. Abbassare il piedino premistoffa.
Cucitura di ritorno
La cucitura a marcia indietro serve a fissare o rinforzare la fine del punto.
6. Spingere più a fondo possibile la leva di cucitura di ritorno e premere
leggermente sul reostato. Cucire circa 5-10 punti a marcia indietro.
7. Rilasciare la leva di cucitura e premere sul reostato per iniziare a cucire
a marcia avanti.