


36
BAS-311E.311EL.326E.326EL
Chapter 3. Assembly
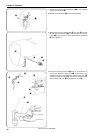
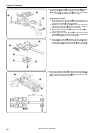
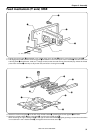
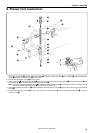
9. Attach the Y-axis feed guide @0 to the left of the X-feed
bracket @1, pressing the former against the latter.
10.Attach the Y-axis feed bracket @2, the cross roller @3, and
the right of the Y-axis feed guide @4 right of the to the X-
feed bracket @1.
Note: When attaching the Y-axis feed guide @4 to the
right of the X-feed bracket @1, lightly push it to the
left so that there is no looseness in the Y-axis feed
guide @2, and tighten the set screw @5.
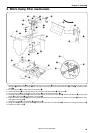
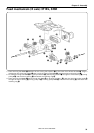
11.Tilt the machine head until it stops.
12.Pass the Y-driving shaft @6 through the Y-driving shaft
holder !6.
Align the reference line on the Y-driving shaft @6 with the
end of the Y-driving shaft holder !6.
Then, tighten the bolt @7.
Note: Be sure to make the X-feed shaft support @8 paral-
lel to the top of the bed to prevent timing belt (Y)
q from being damaged or cut.
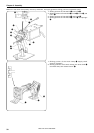
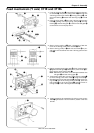
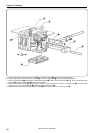
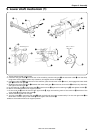
13.Raise the machine head.
14.Temporarily attach the presser arm @9 to the Y-feed
bracket @2 with the screw #0.
15.Pass the X-feed shaft #1 through the X-feed shaft sup-
port @8 and the presser arm @9, then secure it with the set
screw #2.
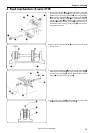
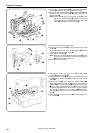
16.Loosen the bolt !5 of the driving P motor bracket w.
When the power is turned off, adjust the driving P motor
bracket w with the adjust bolt !5 so that timing belt (Y)
q is not slack and the presser arm @9 moves smoothly
forwards and backwards. Then power on the machine
and adjust the tension of timing belt (Y) q with the ad-
just bolt #3 so that there is no looseness of the presser
arm @9.
17.After adjustment, tighten the bolt !5 of the driving P mo-
tor bracket w.
Parallel
#0
@1
@3
@2
@5
@4
@9
#1
@0
@8
#2
!6
@8
@6
@7
Line
@6
!6
w
q
!5
#3
@9