


A
B
Dj
©
C
0
x
x
H
r r
r
—II
II
--
-
F=RJFRT
.
—
©
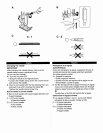
English
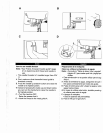
Reverse
stitch
To
reinforce
the
seam,
it
is
recommended
to
begin
or
end
seams
with
several
stitches
in
reverse.
A
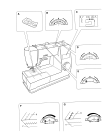
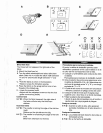
•
Mark
the
point
of
reverse
stitching
as
shown
in
the
illustration.
Place
the
fabric
under
the
foot
so
that
the
needle
pierces
the
fabric
at
the beginning
of
reverse
stitch.
Lower
the
presser
foot
lift.
Reverse
stitch
©
Forward
stitch
©
Reverse
stitch
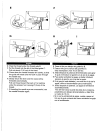
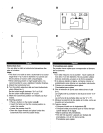
B
•
Press
down
the
reverse
stitch
lever
®
and
start
sewing
backward.
The
sewing
speed
will
be
between
90
—150
r.p.m.
Adjust
the
speed
with
the
speed
control
lever®.
Release
the
lever
to
stop
sewing.
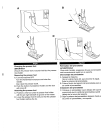
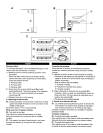
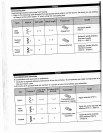
C.
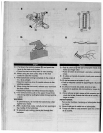
Adjusting
thread
tension
A
balanced
stitch
is
formed
when
the
tensions
of
both
upper
and
bobbin
threads
are
even
and
locked
in
the
middle
of
the layers.
Set
tension
dial
at
“4”
for
normal
sewing.
When
you
have
irregular
stitches
Top
stitch
is
too
tight
This
means
the
upper
thread
tension
is
too
tight.
Reduce
the
tension
by
turning
the
dial
to
a
smaller
number.
©
:
This
means
the
upper
thread
tension
is
too
loose.
Increase
the
tension
by
turning
the
dial
to
a
larger
number.
Espanol
Inversion
de
puntada
Para
reforzar
Ia
costura,
se
recomienda
empezar
y
acabar
las
costuras
haciendo
varios
puntos
en
sentido
inverso.
A
•
Marque
el
punto
donde
ha de
invertirse
Ia
puntada.
Coloque
Ia
tela
debajo
del
prensatelas
e
introduzca
Ia
aguja
en
Ia
tela
en
el
punto
donde
vaya
a
empezar
a
invertir
Ia
puntada.
Baje
Ia
palanca
del
prensatelas.
Puntada
invertida
©
Puntada
en
el
sentido
de
Ia
costura
©
Puntada
invertida
B.
Baje
Ia
palanca
de
inversiOn
de
Ia
puntada
®
y
empiece
a
coser
al
revés.
La
velocidad
de
cosido
se
sitüa
entre
90
y
150
rpm.
Ajuste
Ia
velocidad
con
el
selector
de velocidad
®.
Para
parar
de
coser,
suelte
Ia
palanca.
C.
Ajuste
de
Ia
tension
del
hilo
®:
La
puntada
queda
equilibrada
cuando
Ia
tensiOn
del
hilo
superior
y
Ia
del
hilo
de
Ia
bobina
son
iguales
y
que
los
hilos
se
juntan
en
el
medio
de
las
capas.
Coloque
el
selector
de
tensiOn
en
Ia
posicion
“4”
para
las
costuras
normales.
Puntadas
irregulares
:
Puntada
demasiado
apretada
Esto
significa
que
el hilo
superior
estã
demasiado
tenso.
Reduzca
Ia
tensiOn
seleccionando
un
nümero
inferior.
©:
Puntada
demasiado
floja
Esto
significa
que
el
hilo
superior
está
demasiado
flojo.
Aumente
Ia
tensiOn
seleccionando
un
numero
mayor.