


English
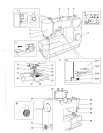
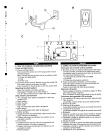
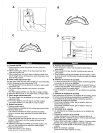
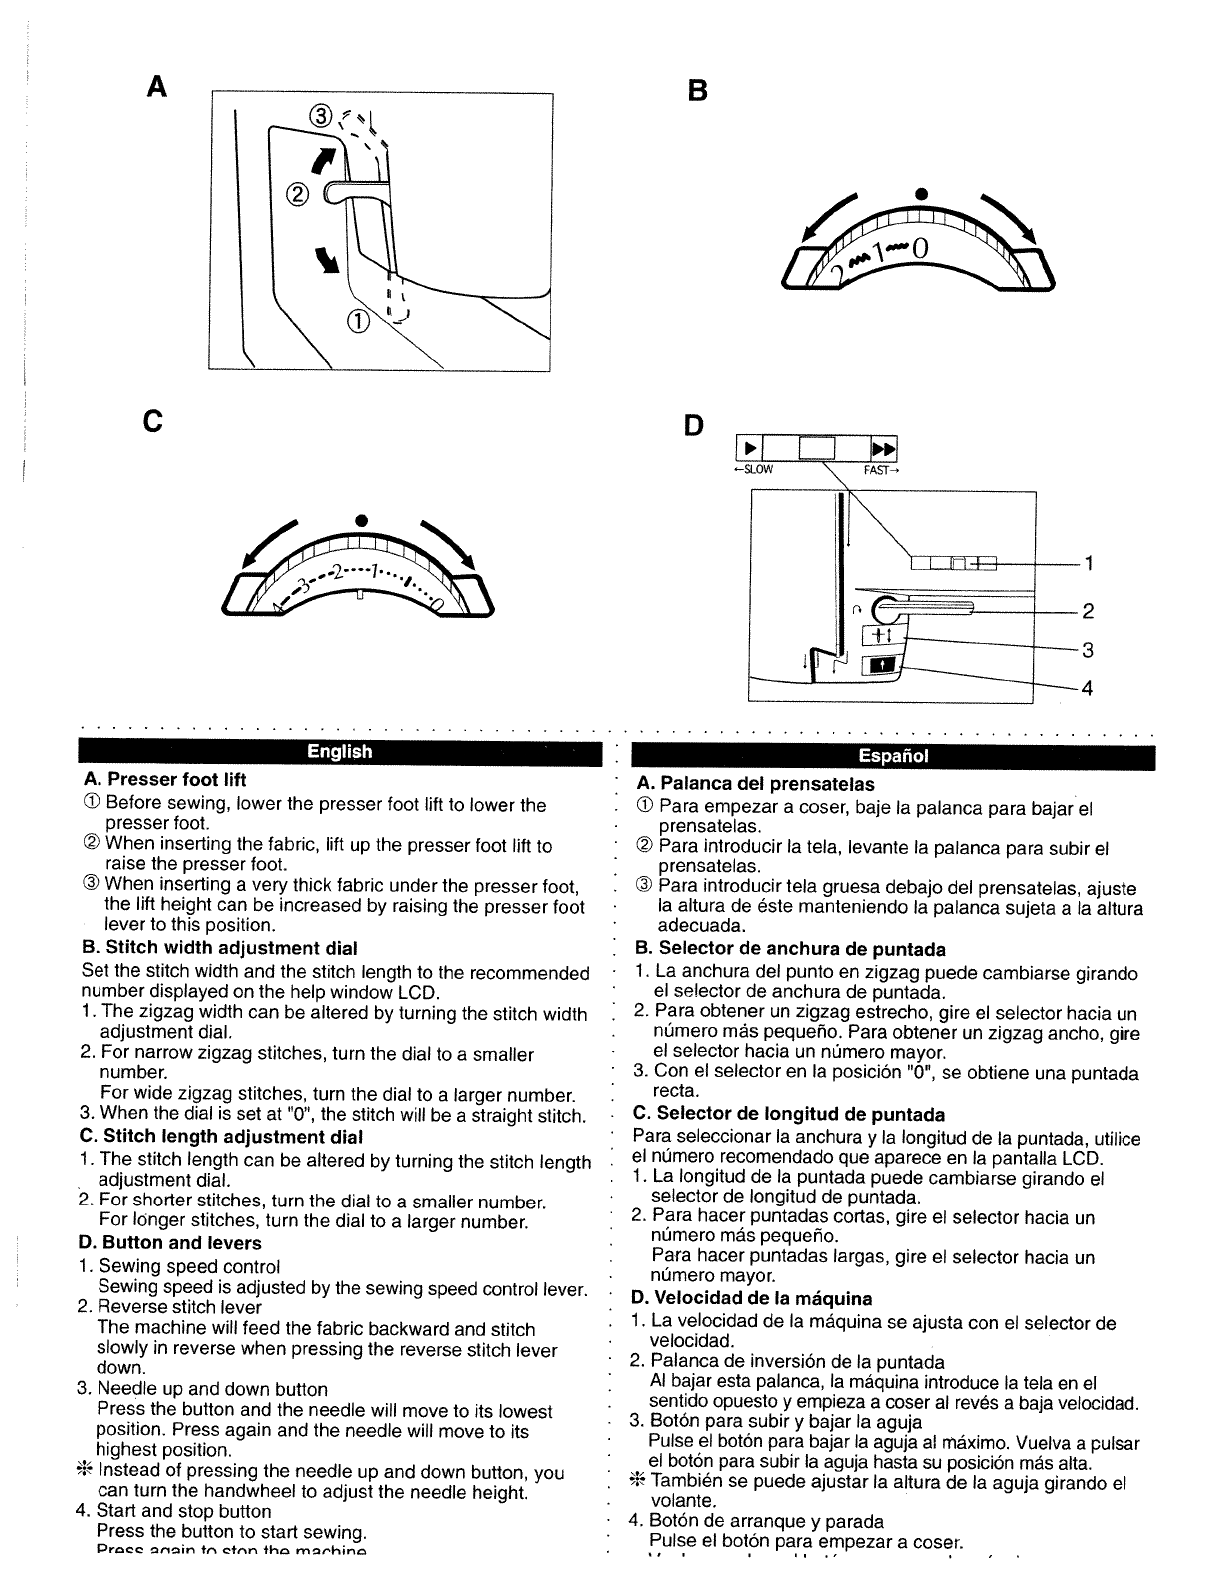
A.
Presser
foot
lift
Before
sewing,
lower
the
presser
foot
lift
to
lower
the
presser
foot.
©
When
inserting
the
fabric,
lift
up
the
presser
foot
lift
to
raise
the
presser
foot.
©
When
inserting
a
very
thick
fabric
under
the
presser
foot,
the
lift
height
can
be
increased
by
raising
the
presser
foot
lever
to
this
position.
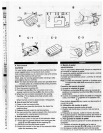
B.
Stitch
width
adjustment
dial
Set
the
stitch
width
and
the
stitch
length
to
the
recommended
number
displayed
on
the
help
window
LCD.
1.
The
zigzag
width
can
be
altered
by
turning
the
stitch
width
adjustment
dial.
2.
For
narrow
zigzag
stitches.
turn
the
dial
to
a
smaller
number.
For
wide
zigzag
stitches,
turn
the
dial
to
a
larger
number.
3.
When
the
dial
is
set
at
‘0’,
the
stitch
will
be
a
straight
stitch.
C.
Stitch
length
adjustment
dial
1.
The
stitch
length
can
be
altered
by
turning
the
stitch
length
adjustment
dial.
2.
For
shorter
stitches,
turn
the
dial
to
a
smaller
number.
For
longer
stitches,
turn
the
dial
to
a
larger
number.
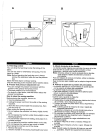
D.
Button
and
levers
1.
Sewing
speed
control
Sewing
speed
is
adjusted
by
the
sewing
speed
control
lever.
2.
Reverse
stitch
lever
The
machine
will
feed
the
fabric
backward
and
stitch
slowly
in
reverse
when
pressing
the
reverse
stitch
lever
down.
3.
Needle
up
and
down
button
Press
the
button
and
the
needle
will
move
to
its
lowest
position.
Press
again
and
the
needle
will
move
to
its
highest
position.
Instead
of
pressing
the
needle
up
and
down
button,
you
can
turn
the
handwheel
to
adjust
the
needle
height.
4.
Start
and
stop
button
Press
the
button
to
start
sewing.
Prc,oc
,,n&r,
fr,
fr,n
+h
m,-hir,,
Español
A.
Palanca
del
prensatelas
•
Para
empezar
a
coser,
baje
a
palanca
para
bajar
el
•
prensatelas.
•
©
Para
introducir
Ia
tela,
levante
Ia
palanca
para
subir
el
prensatelas.
•
©
Para
introducir
tela
gruesa
debajo
del
prensatelas,
ajuste
•
Ia
altura
de
éste
manteniendo
Ia
palanca
sujeta
a
Ia
altura
•
adecuada.
B.
Selector
de
anchura
de
puntada
•
1.
La
anchura
del
punto
en
zigzag
puede
cambiarse
girando
el
selector
de
anchura
de
puntada.
2.
Para
obtener
un
zigzag
estrecho,
gire
el
selector
hacia
un
•
nümero
más
pequeno.
Para
obtener
un
zigzag
ancho,
gire
-
el
selector
hacia
un
nümero
mayor.
•
3.
Con
el
selector
en
Ia
posiciOn
“0”,
se
obtiene
una
puntada
recta.
C.
Selector
de
longitud
de
puntada
•
Para
seleccionar
Ia
anchura
y
Ia
longitud
de
Ia
puntada,
utilice
el
nümero
recomendado
que
aparece
en
Ia
pantalla
LCD.
•
1.
La
longitud
de
Ia
puntada
puede
cambiarse
girando
el
•
selector
de
longitud
de
puntada.
•
2.
Para
hacer
puntadas
cortas,
gire
el
selector
hacia
un
nümero
más
pequeno.
•
Para
hacer
puntadas
largas,
gire
el
selector
hacia
un
•
nümero
mayor.
D.
Velocidad
de
Ia
máquina
•
1.
La
velocidad
de
Ia
máquina
se
ajusta
con
el
selector
de
•
velocidad.
•
2.
Palanca
de
inversiOn
de
Ia
puntada
Al
bajar
esta
patanca,
Ia
mãquina
introduce
Ia
tela
en
el
•
sentido
opuesto
y
empieza
a
coser
al
revés
a
baja
velocidad.
3.
BotOn
para
subir
y
bajar
Ia
aguja
•
Pulse
el
botOn
para
bajar
Ia
aguja
at
máximo.
Vuelva
a
pulsar
el
botOn
para
subir
Ia
aguja
hasta
su
posiciOn
más
alta.
También
se
puede
ajustar
Ia
altura
de
Ia
aguja
girando
el
•
volante.
•
4.
BotOn
de
arranque
y
parada
Pulse
el
botOn
para
empezar
a
coser.
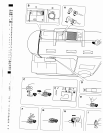
B
A
C
D
1
2
3
4