


English
3.
SETTING
UP
YOUR
MACHINE
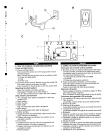
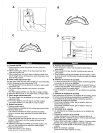
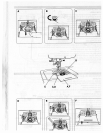
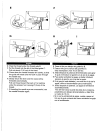
Winding
bobbin
A.
Put
a
thread
spool
and
spool
cap
on
to
the
spool
pin.
*
Leave
an
opening
of
1/16”(2
mm)
between
the
thread
spool
and
spool
cap.
•
For
a
small
thread
spool,
use
small
cap
side.
•
For
a
large
thread
spool,
use
large
cap
side.
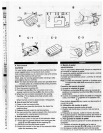
B.
Draw
thread
through
thread
guide
D,
and
bobbin
thread
guide
©.
C.
Pass
the
thread
end
through
the
hole
of
the
bobbin
as
shown.
•
Place
the
bobbin
on
to
the
bobbin
winder
shaft
so
the
groove
will
meet
the
shaft
spring.
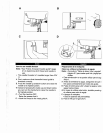
•
Push
the
bobbin
down
and
the
bobbin
winder
shaft
will
automatically
move
to
the
right.
()
is
displayed
on
the
help
window
LCD.
D.
For
faster
bobbin
winding,
slide
the
sewing
speed
control
lever
to
the
right.
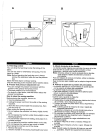
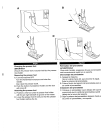
WARNING
Do
not
touch
the
bobbin
wñider
shaft
when
winding
the
bobbfri.
E.
Hold
the
thread
end.
Press
the
start
and
stop
button
and
start
the
machine.
*
When
using
the
foot
control,
step
on
the
foot
control
to
start
the
machine.
F.
After
winding
a
little,
stop
the
machine
and
cut
extra
thread
above
the
bobbin
hole
and
continue.
G.’
The
bobbin
will
stop
when
fully
wound.
•
Press
the
start
and
stop
button
and
stop
the
machine.
*
When
using
the
foot
control,
release
your
foot
from
the
foot
control.
H.
Push
the
bobbin
winder
shaft
back
to
the
left
with
your
finger.
*
You
are
not
able
to
sew
when
the
bobbin
winder
is
set
on
the
right.
I.
•
Remove
the
bobbin
from
the
shaft.
•
Cut
the
thread.
Espanol
3.
PREPARACION
DE
LA
MAQUINA
Hacer
canilla
A.
Coloque
una
bobina
de
hilo
y
el
tope
de
bobina
en
el
eje
portabobina.
*
Deje
un
espacio
de
2
mm
entre
Ia
bobina
y
el
lope.
•
Para
una
bobina
pequeña
•
Para
una
bobina
grande
B.
Pase
el hilo
por
el
guiah
lbs
y
Ia
gula
del
hilo
de
Ia
can
lila
©.
Guiahilos
®.
Gula
del
hilo
de
Ia
canilla
©.
C.
Pase
el
cabo
del
hilo
por
el
agujero
de
Ia
canilla,
como
se
muestra
en
Ia
ilustraciOn.
•
Coloque
Ia
canilla
en
el
eje
para
hacer
canilla
de
modo
que
Ia
ranura
corresponda
al
resorte
del
eje.
Empuje
Ia
canilla.
El
eje
se
desplazará
automãticamente
hacia
Ia
derecha.
•
El
sImbolo
(
)
aparecerá
en
Ia
pantalla
LCD.
D.
Para
acelerar
el
bobinado,
deslice
el
selector
de
velocidad
hacia
Ia
derecha.
ADVERTENCIA
No
toque
el
ej’para
hacercanihla
cuando
esté
bob,iando.
E.
Sujete
eI
cabo
del
hilo.
Pulse
el
botOn
de
arranque
y
parada
para
arrancar
Ia
máquina.
±
Si
utiliza
el
mando
de
pedal,
piselo
para
arrancar
Ia
máquina.
F.
Cuando
Ia
canilla
haya
dado
varias
vueltas,
pare
Ia
mãquina,
corte
el
cabo
que
sale
por
el
agujero
de
Ia
canilla
y
siga
bobinando.
G.•
La
canilla
se
para
sola
cuando
esté
completamente
bobinada.
•
Pulse
el
botOn
de
arranque
y
parada
para
parar
Ia
máquina.
±
Si
utiliza
el
mando
de
pedal,
levante
el
pie.
H.
Vuelva
a
colocar
eI
eje
en
su
sitio
empujándolo
hacia
Ia
izquierda
con
el
dedo.
4
i
Hci
cI
rIcl
lwIn
rIrrhn
n,
nodr.i
nncr