


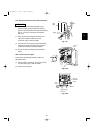
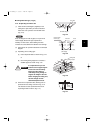


K
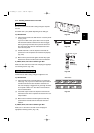
(1) Shape the refrigerant tubing so that it can easily go into
the wall hole. (Fig. 3-62)
CAUTION
If using a stepladder, be careful to
keep your balance and not fall off.
To prevent the unit from damage
and avoid personal injury, ask for
someone’s help when feeding the
tubing through the hole because
the unit is heavy and difficult to
hold in place.
(2) Push the wiring, refrigerant tubing, and drain hose
through the hole in the wall. Adjust the indoor unit so it is
securely seated on the rear panel.
(3) Carefully bend the tubing (if necessary) to run along the
wall in the direction of the outdoor unit and then tape as
far as the fittings.
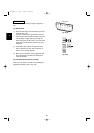
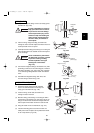
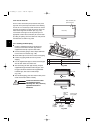
(4) Connect the refrigerant tubing to the outdoor unit. (After
performing a leak test on the connecting part, insulate it
with tubing insulation. (Fig. 3-64)) Also, refer to Section
10-5. Connecting Tubing between Indoor and Outdoor
Units.
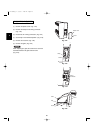
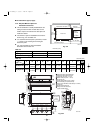
(5) Assemble the refrigerant tubing, drain hose, and
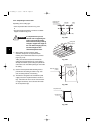
inter-unit wiring as shown in Fig. 3-65.
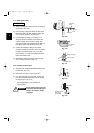
(1) Shape the narrow refrigerant tube and drain
hose in the desired direction so that they can
easily go into the wall hole. (Fig. 3-66)
(2) Push the wiring, narrow tube, and drain hose
through the hole in the wall.
(3) Bend the tubing (if necessary) to run along the wall in
the direction of the outdoor unit, then tape as far as the
fittings. The drain hose should come straight down the
wall to a point where water runoff won't stain the wall.
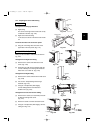
(4) Hang the indoor unit on the wall fixture. (Fig. 3-67)
(5) Install the mounting plate to secure the indoor unit
solidly to the wall. The plate can be positioned in either
of the 2 ways shown. (Fig. 3-68)
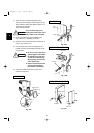
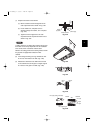
CAUTION
The air conditioner’s performance
will deteriorate if a tube is crushed.
To prevent crushing of tubing,
avoid sharp bends. Use a pipe
bending tool to bend tubes.
(Fig. 3-63)
Cover
Refrigerant
tubing
Drain hose
Inter-unit
wiring
Fig. 3-62
Pipe bending tool
a
b
b / a = 0.7 or more
Fig. 3-63
Insulation
(Field supply)
Fig. 3-64
Refrigerant tubing
Drain hose
Conduit
Inter-unit wiring
Fig. 3-65
KHH(S)2672R
KH(S)3072R, KH(S)3672R
Mounting plate
Screws
Or
Fig. 3-68
Fig. 3-67
Wall
Wall fixture
Indoor
unit
45
Liquid
tube
Drain hose
Fig. 3-66
07-115 SSHP_II 5/7/07 4:00 PM Page 45