


83
OPERATING PROCEDURE
PHOTOS
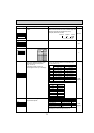
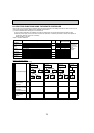
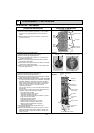
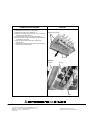
7. Removing the solenoid valve coil <4-way valve> (21S4)
(1) Remove the service panel. (See Figure 1)
(2) Remove the top panel. (See Figure 1)
[Removing the solenoid valve coil <4-way valve>]
(3) Remove 4-way valve solenoid coil fixing screw (M4 × 6).
(4) Remove the solenoid valve coil <4-way valve> by sliding
the coil toward you.
(5) Disconnect the connector 21S4 (green) on the controller
circuit board in the electrical parts box.
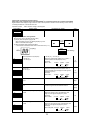
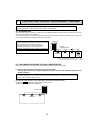
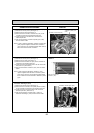
8. Removing the 4-way valve
(1) Remove the service panel. (See Figure 1)
(2) Remove the top panel. (See Figure 1)
(3) Remove 3 valve bed fixing screws (4 × 10) and 4 ball valve
and stop valve fixing screws (5 × 16) and then remove the
valve bed.
(4) Remove 4 right side panel fixing screws (5 × 10) in the
rear of the unit and then remove the right side panel.
(5) Remove the solenoid valve coil <4-way valve>. (See Photo 7)
(6) Recover refrigerant.
(7) Remove the welded part of 4-way valve.
Note 1: Recover refrigerant without spreading it in the air.
Note 2: The welded part can be removed easily by removing
the right side panel.
Note 3: When installing the 4-way valve, cover it with a wet
cloth to prevent it from heating (120°C [250°F] or
more), then braze the pipes so that the inside of pipes
are not oxidized.
Photo 7
Solenoid valve coil
<4-way valve>
(21S4)
4-way valve
Solenoid valve coil
<4-way valve>
fixing screw
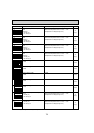
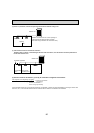
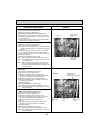
9. Removing solenoid valve coil <Bypass valve> (SV1) and
bypass valve
(1) Remove the service panel. (See Figure 1)
(2) Remove the top panel. (See Figure 1)
(3) Remove the electrical parts box. (See Photo 4)
(4) Remove 3 right side panel fixing screws (5 × 10) in the
rear of the unit and remove the right side panel.
(5) Remove the bypass valve coil fixing screw (M4 × 6).
(6) Remove the solenoid valve coil <Bypass valve> (SV1)
by sliding the coil upward.
(7) Recover refrigerant.
(8) Remove the welded part of bypass valve.
Note 1: Recover refrigerant without spreading it in the air.
Note 2: The welded part can be removed easily by removing
the right side panel.
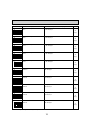
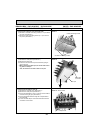
10. Removing solenoid valve coil (Returning oil bypass)
<Bypass valve> (SV2) and bypass valve
(1) Remove the service panel. (See Figure 1)
(2) Remove the top panel. (See Figure 1)
(3) Remove the electrical parts box. (See Photo 4)
(4) Remove 3 right side panel fixing screws (5 × 10) in the
rear of the unit and remove the right side panel.
(5) Remove the bypass valve coil fixing screw
(M5 × 6).
(6) Remove the solenoid valve coil
(Returning oil bypass)
<Bypass valve> (SV2) by sliding the coil upward.
(7) Recover refrigerant.
(8) Remove the welded part of bypass valve.
Note 1: Recover refrigerant without spreading it in the air.
Note 2: The welded part can be removed easily by removing
the right side panel.
Photo 8
Solenoid valve coil
<Bypass valve>
(Returning oil bypass) (SV2)
Bypass valve
(SV2)
Solenoid valve coil
<Bypass valve>
(SV1)
Bypass valve
(SV1)